Enhancing Security Teams with AI-Powered Email Solutions
Discover email-based attack challenges & how AI security solutions can tackle these attacks with autonomous action, optimized workflows, and user visibility.
Darktrace cyber analysts are world-class experts in threat intelligence, threat hunting and incident response, and provide 24/7 SOC support to thousands of Darktrace customers around the globe. Inside the SOC is exclusively authored by these experts, providing analysis of cyber incidents and threat trends, based on real-world experience in the field.
Written by
Dan Fein
VP, Product
Share
02
Apr 2023
The modern security team faces challenges on all fronts – it is too often overstretched dealing with an increased attack surface, enabling workforces for secure remote work, and managing multiple security tools to protect that workforce. Added to that, the surge in more sophisticated phishing campaigns – now supported by AI tools – means that it’s harder than ever to pre-empt attacks.
The needs of the security team should be a key consideration when deploying an email security solution, as it’s them who will be accountable for the success and maintenance of the product. Minimizing time spent inside the user interface – through trusted detection and response technology combined with intuitive reporting and optimized workflows – should be front of mind for vendors in order to assure teams of their value.
Taking security teams off the frontline
No team should be spending all of their time maintaining email security policies, releasing emails that shouldn’t have been held, or holding back emails that should have been – all the things that traditional email security solutions have almost forced them to become accustomed to. A day in the life of an admin shouldn’t include tens – and certainly not hundreds – of minutes spent in their email security dashboard.
At the moment, teams are logging in far too often, and when they do, they’re forced to make individual decisions about safe listing and blocking domains, or releasing emails. These can lead to the creation of blanket rules that open up future windows for attackers – unintended consequences that ultimately create more work in the future. This type of hand-to-hand combat puts security teams on the frontline, when their time could be much better spent doing the high-level strategic work humans are best at.
Understanding You: A Different Approach to Email Security
In today’s discussions about email security, there is a consensus that relying on a gateway is no longer feasible. The new era is one of ICES (Integrated cloud email security) solutions and other tools leveraging artificial intelligence and APIs. But there's no point adopting new technology with an old philosophy – and most of these solutions use AI to automate the same old approach: looking at past attacks to try and stop the next.
This is where Darktrace/Email takes a fundamentally different and unique approach. It’s not just about using AI; it’s about using it in the right capacity. Our AI understands you – learning where users log in from, who they email, their behavior throughout the day – to tailor the detection and response process according to their individual profile. There’s no point withholding an email if only a tiny element of it poses a risk – Darktrace/Email takes the least aggressive action required to neutralize a threat. Instead of a blanket allow-deny criteria, it can rewrite links or withhold attachments based on its knowledge of the user’s normal inbox activity. Stopping malicious emails while allowing legitimate emails through – with risky elements neutralized – lifts security teams out of the fire-fighting activities described earlier and frees up their time for more strategic and valuable decision-making.
This is going to get me to reduce my current email security stack… this is going to take it to that level that I need it to”
Embedded account takeover protection is an essential component of modern email security. Security teams need visibility not just over email breaches but of what happens once an attacker has control of an inbox, particularly in the most damaging use cases like Business Email Compromise (BEC) and ransomware. This entails understanding a user’s behavior in their inbox, outbound emails and beyond into their wider account activity. Darktrace captures a user’s activity across email and their Microsoft or Google account in a single pane of glass – detecting and countering all of the markers that could signify a compromised account.
Insights from other cloud applications and network devices gleaned from Darktrace's wider visibility of the business can bring a 360° understanding of the user, further enhancing detection of account takeover and other harmful activity.
Figure 1: A 360° understanding of a user reveals their digital touchpoints beyond Microsoft
What ‘user-friendly’ actually looks like
The best user interface is one that you never have to log into. In an ideal world, teams are able to visit their tools less frequently because intelligent AI is automating work previously done by humans. This is made possible by Darktrace’s precision detection and response technology, which takes appropriate action on emails and accounts to neutralize threats without disrupting day-to-day business operations.
The second-best user interface is one where you can quickly log in and get key insights fast, whether that’s regarding an action taken or the current activity of a user – and then get out. Darktrace/Email enables teams to get key information quickly, at both a high and granular level. The dashboard offers immediate insights into users and emails, with a real-time snapshot of active user identities, targeted user and actioned emails, segmented by type of attack.
At every touchpoint, Darktrace reduces friction with optimized workflows. From being able to quickly identify VIPs to safely previewing links and attachments, security teams can get the information they need without needing to switch between windows or navigate inaccessible interfaces. Explainable AI gives users natural-language summaries of individual emails or the overall health of an email environment, and simplified action flows allow security teams to personalize security for different employees – for example, sending VIPs a unique notification, or taking extra precautions around employees who work in accounting. Taken together, this meaning that admins can spend even less time managing policies.
Figure 2: Darktrace/Email dashboard displaying key information about the email environment in a single pane of glass
The ideal interface is also the one that’s the most accessible to you. The mobile app guarantees convenience for security teams, making available all the main functions of the interface for on-the-go analysis at any time or place. Teams can travel or leave the office while retaining the peace of mind that if a critical incident was to occur, they would be able to get instant visibility on the data and take action without needing to get back to their desks.
Figure 3: Security admins are able to preview, analyze, and act on emails directly from the Darktrace Mobile App
With every passing day, the security team can rest easier. Every activity is taken into account to help the AI tune and adapt over time to become even better at detecting and responding to threats.
Having email on the app is going to be game changing”
- Early Look Customer, Darktrace/Email
Getting the full picture
Most often, email is the entry point from which a threat actor moves stealthily throughout an organization collecting information and assets. Most solutions look at email in isolation, without prioritizing or connecting disparate events into a wider pattern.
In contrast, Darktrace/Email integrates seamlessly with Darktrace's Cyber AI Analyst, a technology that conducts autonomous enterprise-wide investigations around every alert produced by the wider Darktrace platform. Through this integration, malicious email activity is analyzed and displayed in the context of the full security incident to which it belongs. As a result, security teams can see why and how a wider problem might have originated in email and spread to other apps, endpoints, or the wider corporate network.
Empowering employees to take an active role in security
The role of the security team can be made more difficult if employees take a lax or disengaged approach to security – or if a user is given too much control, and has the ability to make potentially dangerous decisions. Training employees on security procedures is another to-do which can easily fall to the bottom of the agenda during busy periods, especially as point-in-time phishing simulations have proven to be not particularly effective.
To this end, Darktrace/Email uses Explainable AI to say in natural language what it thought about an email, and delivers its findings not just to the security team, but optionally to the wider workforce as well. Delivered in the form of contextual banners in emails, periodic digests, or directly in Outlook, these insights transform security education from a quarterly or yearly exercise into real-time security awareness. Our next blog will dive deeper into how employee engagement can support the security team’s efforts and harden defenses throughout the organization.
Because Darktrace is built on a fundamentally different approach, it not only stops novel and targeted sophisticated attacks but allows legitimate emails to flow through. This is what makes it a truly set-and-forget technology, with the AI taking on much of the heavy lifting previously undertaken by security teams.
Darktrace cyber analysts are world-class experts in threat intelligence, threat hunting and incident response, and provide 24/7 SOC support to thousands of Darktrace customers around the globe. Inside the SOC is exclusively authored by these experts, providing analysis of cyber incidents and threat trends, based on real-world experience in the field.
Darktrace / EMAIL Expands Behavioral Defense Across Email and Collaboration Workflows
New capabilities help employees understand suspicious content, give administrators more control over sensitive data, and show security teams where risky workflows sit across the organization.
Journey of a Threat: How Multi-Layered AI Works in Darktrace / EMAIL
Follow a malicious email as it moves through Darktrace / EMAIL’s multi-layered AI system, from raw data to final decision. Each layer works together to detect threats, understand intent, and take autonomous action.
Building Operational Resilience Across Mission-Critical Marine Services
Mission-Critical Marine Services
This marine organization supports offshore energy production, export infrastructure, and regional logistics, delivering critical services through its diverse fleet and a regional shorebase footprint. To power rapid mobilization and 24/7 operational readiness, the organization has embraced cloud adoption and digital transformation, reshaping how crews, contractors, and shore-based teams access services.
While technology modernization has enhanced operations, it has also introduced new security complexities.
From perimeter to identity: As access becomes more distributed, identity has become the primary security control, elevating the risk of credential compromise and privilege misuse.
From confidentiality to availability and resilience: As cloud platforms increasingly underpin fleet and operational systems, cyber incidents can disrupt services and safety.
From isolated tools to unified visibility: Because Information Technology (IT) and Operational Technology (OT) often intersect, and legacy systems coexist with modern cloud platforms, fragmented monitoring makes it harder to understand risk and respond decisively across domains.
“Our cybersecurity priorities expanded along with our business goals, placing availability and resilience at the forefront. The impact of a potential threat became an operational risk, which elevated cybersecurity from an IT issue to an operational safety and resilience enabler.” - Information and Communications Technology (ICT) Manager.
A Unified, AI-Driven Platform for IT and OT
To strengthen visibility, detection, and response across its highly distributed environment, the customer adopted the Darktrace ActiveAI Security Platform™ in 2022.
Darktrace’s contextual detection capability was a key driver. Unlike traditional tools that rely on known threat signatures, Darktrace’s Self-Learning AI learns “normal” behavior to identify emerging threats and correlate visibility across the customer's siloed on-premises and cloud domains.
Today, the customer relies on:
Darktrace / EMAIL™ to reduce phishing risk and minimize disruption from legacy mail controls and false positives
Darktrace / IDENTITY™ to support identity-centric security as cloud access expands across vessels and shore-based operations
Darktrace / NETWORK™ to strengthen oversight across the broader environment, including operational contexts where IT and OT intersect
Darktrace / CLOUD™ (Azure), added in 2024, to extend detection and response into Azure and support cloud transformation without treating cloud as a separate security silo
Darktrace / Incident Readiness & Recovery to strengthen incident readiness and recovery planning
Darktrace Managed Detection and Response Services to provide 24/7/365 monitoring and support
This combination supports a single operating model for the customer: security that can adapt as the environment changes while remaining practical for a lean team responsible for safeguarding both business operations and safety-critical services.
Extending cloud protection without complexity
As the customer accelerated cloud adoption, it expanded coverage in 2024 with Darktrace / CLOUD for Azure to bring cloud workloads under the same AI-driven visibility and response model – without adding operational burden. “This matters in hybrid environments because attacks rarely stay in one place,” explains the ICT Manager. “A compromised identity can trigger activity in the cloud, which can open pathways back into on-premises systems.”
In parallel, Darktrace / CLOUD’s posture management capabilities support governance and audit readiness by surfacing misconfigurations and exposure risks earlier, before they become incidents.
A Stronger, Faster, More Resilient Business
Since adopting Darktrace, the customer has strengthened cyber resilience while reducing operational burden on its small ICT team.
Darktrace continuously analyzes millions of individual events that can contribute to a wider incident. Within a single month, the solution autonomously investigated 88% of all potential threats, taking appropriate action within just 39.4 seconds on average.
Autonomous capabilities ensure threats are stopped and contained until the ICT team can investigate. In one standout instance, Darktrace autonomously blocked malicious links during a mass phishing/spam event before other controls flagged the threat. the ICT Manager later confirmed Microsoft reported the link as malicious, but Darktrace had already acted to prevent delivery and reduce exposure.
“Whether something happens during off hours, while we’re on vacation, or when our attention is focused elsewhere, we’re confident Darktrace will take control and stop a threat before it spreads,” says the ICT Manager.
Darktrace’s Self-Learning AI combines multiple AI methods and advanced techniques to improve threat detection, investigation, and response dramatically reducing alert overload and manual triage. Within a single month, the solution saved the customer's IT group 411 equivalent human investigation hours.
“For a lean team supporting a 24/7 operational footprint, this autonomous action eliminates the constant firefighting and stress, giving us the space to focus on higher-value priorities.”- Information and Communications Technology (ICT) Manager.
Protecting communications without disruption
the customer experienced friction from legacy email and network controls prior to Darktrace, which generated high false positive rates, disrupted legitimate communications, created operational drag, and added workload for ICT. With Darktrace / EMAIL learning normal email behavior and applying context-aware actions, the team reduced unnecessary interruptions while maintaining protection.
“That shift matters in marine services, where business communications directly support coordination across vessels, shore bases, clients, ports, and regulators,” says the ICT Manager. “Darktrace doesn’t just block more threats, it autonomously makes decisions that preserve operational continuity and enable my team to focus on credible threats instead of chasing volume.”
Delivering clarity and confidence
Darktrace has reduced manual triage by correlating activity across email, identity, network, and cloud, providing the context needed to prioritize what matters without requiring the ICT team to stitch together evidence across multiple tools.
“With unified visibility we can identify patterns across domains, make informed decisions about where risk actually exists, and align security actions with operational impact rather than theoretical threats,” explains the ICT Manager. “I can now prioritize effort and investment across our ICT landscape with far greater confidence.”
Regular Executive Threat Reports reinforce operational confidence by giving leadership clear visibility into threats Darktrace has handled autonomously, supporting decisive action when needed and confidence to avoid unnecessary disruption when it isn’t.
Scaling Securely in a Hybrid World
As the customer advances its cloud transformation, the ICT Manager sees the Darktrace partnership evolving into a foundational layer of resilience and assurance, supporting scale, governance, and operational confidence in an increasingly cloud-centric environment.
Key priorities include:
Shifting from hybrid visibility to cloud-first resilience, using continuous monitoring and posture insights to reduce exposure earlier
Strengthening governance and audit readiness, especially as critical workloads and sensitive data expand in Azure and expectations rise under regulatory and client assurance requirements
Increasing reliance on autonomous response and AI investigation as the number of identities, workloads, and access paths grows faster than headcount
Deepening cross-domain correlation so cloud signals further enrich decision-making, supporting faster containment and more confident prioritization
“As we accelerate our cloud strategy, Darktrace will play an even more strategic role,” says the ICT Manager, “providing the guidance, technology, and expertise that allow us to grow with confidence and innovate securely.”
Hiding in Plain Sight: Uncovering a Multi-Stage Ransomware Attack Through Behavioral Detection
Why ransomware has changed
Ransomware attacks have continued to increase globally, with 698 incidents reported in May 2026, representing a 48% rise compared to 472 incidents in May 2025 [1]. At the same time, the ransomware landscape is evolving. Several major ransomware groups, including LockBit [2], have been disrupted by successful joint law enforcement operations, resulting in a shift away from a small number of dominant actors towards a more fragmented and distributed ecosystem. This is increasingly composed of smaller groups who play a specialized role in the attack, such as initial access brokers, affiliates or developers.
As a result, ransomware tactics, techniques, and procedures (TTPs) are becoming more diverse and less predictable. On top of this, adversaries are leveraging native tools and legitimate penetration testing frameworks to evade detection. Anomaly-based detection is therefore critical to identify pre-ransomware activity, rather than relying on signatures associated with a handful of well-known ransomware groups.
As these attacks often unfold over several days, there is a critical window for defenders to act. In this context, behavioral-based detection plays a vital role in identifying suspicious pre-ransomware activity, and enabling early intervention before encryption or exfiltration occurs.
Inside a modern ransomware intrusion
In early 2026, Darktrace detected activity within a customer’s environment related to a multi-stage ransomware intrusion from the initial compromise. This activity does not appear to be attributable to a specific ransomware group, and no known ransomware payload was observed until the final stage.
The attack aligns with a broader industry trend in which compromised virtual private network (VPN) credentials are used as an entry point, followed by rapid internal reconnaissance and lateral movement using legitimate administrative tools. This growing preference for native tools and legitimate frameworks in cyber-attacks illustrates that it is increasingly unreliable to depend solely on traditional indicators of compromise such as known malware signatures or exploit detection.
The intrusion also involved the use of Sliver, an open-source adversary emulation framework, which is increasingly observed in real-world attacks. Originally designed for penetration testing and red teaming, Sliver has gained traction among threat actors as a stealthier alternative to more heavily signatured frameworks such as Cobalt Strike. As a legitimate framework, its use further complicates detection for security tools that rely on known malicious signatures.
Darktrace’s detection of a ransomware event in a customer’s environment
The initial compromise appears to have occurred via compromised credentials used over the VPN shortly before, or at the onset of the first indicators of suspicious activity. While it remains unclear as to how or when the threat actors gained access to these credentials, the use of initial access brokers (IABs) is a common feature of modern ransomware operations. This suggests that access to the environment may have been established several days or weeks beforehand.
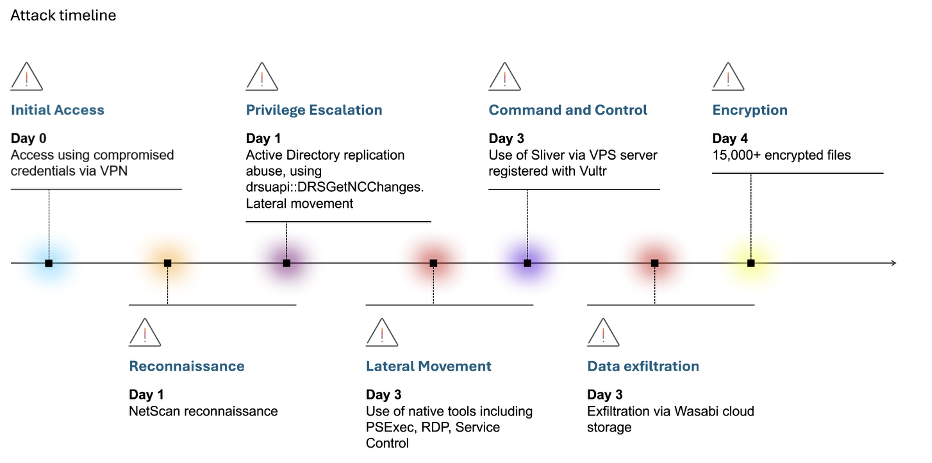
The intrusion unfolded over three days, presenting multiple opportunities for early detection and intervention before ransomware deployment. The attack progressed through a compressed but structured sequence: initial access and reconnaissance were completed within hours, followed by privilege escalation and lateral movement the next day, and culminating in data exfiltration and encryption shortly thereafter. Throughout each stage, distinct behavioral anomalies emerged across the network providing clear indicators of malicious activity well before the ransomware was deployed.
While Darktrace’s Autonomous Response capability was enabled within the customer’s environment, it was not fully configured across the impacted devices, allowing the attack to progress to ransomware deployment. Had Autonomous Response been fully deployed across the affected systems, it could have taken targeted action against the earliest stages of malicious activity, potentially disrupting the intrusion before it escalated.
Figure 1: Timeline of the attack progression.
Day 1: Reconnaissance and privilege escalation
The threat actor gained access via compromised VPN credentials and initiated internal reconnaissance. Darktrace detected anomalous scanning behavior, including unusual port scanning activity and widespread network enumeration.
Specifically, Darktrace detected a high volume of east-west scanning activity across a broad range of ports, with TCP connections targeting ports 21, 80, 445, 4899 and 8080. Associated URIs suggested the use of Nmap, a widely used penetration testing tool. This highlights how attackers often leverage legitimate penetration testing tools for malicious reconnaissance, enabling them to blend into normal network activity and evade traditional signature-based detection methods.
Figure 2: Darktrace's detection of a sharp increase in anomalous internal connections, triggering multiple high-severity model alerts associated with reconnaissance activity.
Several devices were observed using administrative credentials to carry out privileged actions in a manner that was highly anomalous for the environment. This activity was accompanied by behavior consistent with SMB authentication scanning, suggesting efforts to identify and access additional systems. As the activity intensified, an increasing number of devices became involved, signalling lateral movement and further spread across the network.
Darktrace also identified privilege escalation through active directory (AD) replication abuse, specifically via the drsuapi::DRSGetNCChanges function. This technique allows an attacker with sufficient privileges to request directory replication data from a domain controller (DC), enabling them to extract credentials, including password hashes, without directly interacting with user accounts. Commonly associated with ‘DCSync’ attacks, this technique is frequently used to obtain highly privileged credentials and enable further escalation within an environment.
Figure 3: Darktrace’s detection of anomalous AD replication activity indicative of privilege escalation.
This activity was seen alongside the use of the now obsolete SMBv1, repeated NTLM authentication attempts using multiple variations of ‘Administrator’ credentials, reverse DNS scanning, and large-scale network scanning. Darktrace observed widespread use of SMBv1 across the customer’s environment, exposing a significant security weakness. As a legacy protocol with well-documented weaknesses, SMBv1 can be exploited to facilitate lateral movement, allowing the attackers to expand their access following initial compromise.
Day 3: Lateral Movement, Command & Control, and Exfiltration
Two days later, the attacker escalated privileges and expanded their foothold using living-off-the-land (LOTL) techniques such as PSExec, WMI, and RDP. Concurrently, Darktrace identified command-and-control (C2)-style communications consistent with the Sliver framework, alongside rare outbound connections to cloud infrastructure indicating potential data exfiltration. The volume and severity of observed activity increased as attack behavior intensified.
The device was observed conducting extensive lateral movement, leveraging LOTL techniques to evade detection. Activity included WMI execution (e.g. ExecQuery), DCE-RPC activity, SMB sessions and file writes, most of which were successful, as well as the deployment of PSEXESVC.exe via ADMIN$ shares and prolonged RDP sessions. Darktrace identified this behavior as highly anomalous for the environment. Such activity is commonly associated with the transfer of attacker tooling, remote command execution, and the establishment of persistent access across compromised systems.
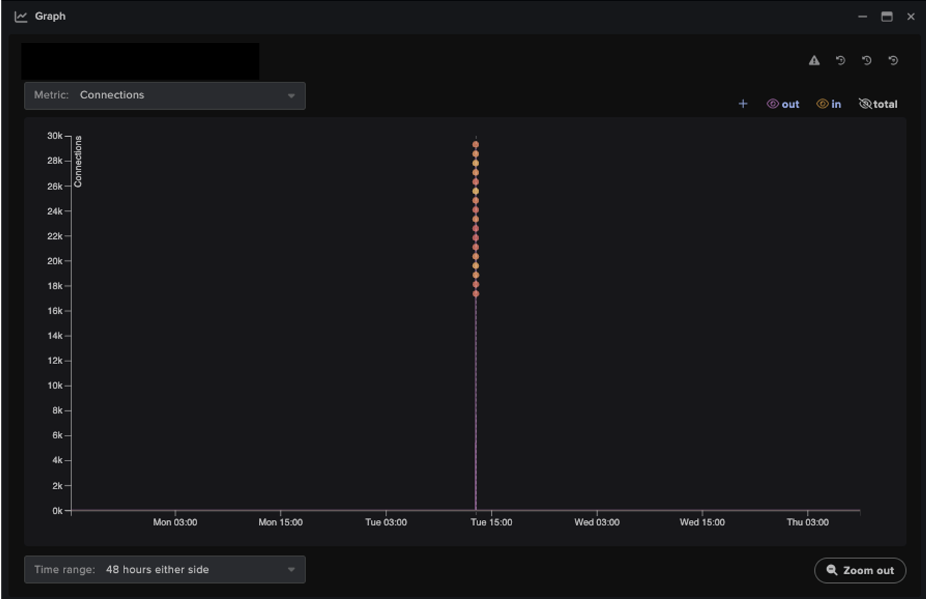
Figure 4: Darktrace’s detection of a spike in RPC binding events indicative of potential lateral movement.
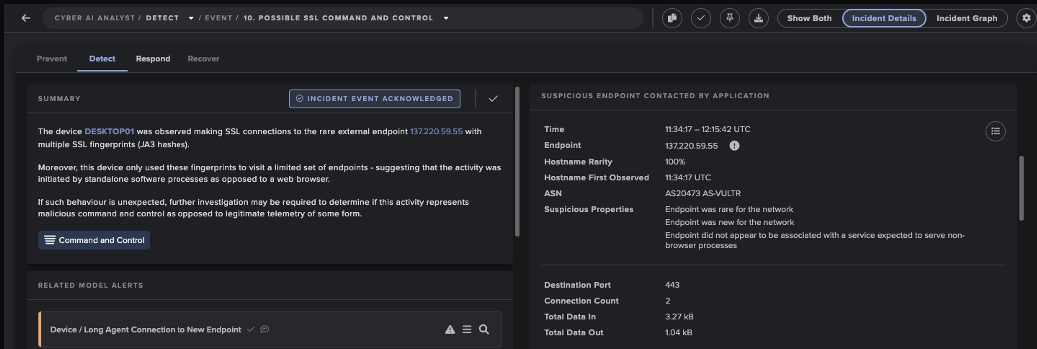
On the same day, Darktrace detected C2-style SSL communications originating from multiple internal devices to rare external endpoints. These connections exhibited anomalous characteristics, including invalid SSL certificates and repeated connection patterns resembling beaconing. Analysis of the observed JA3 fingerprint further linked the activity to Sliver, the adversary simulation framework referenced earlier, as the hash has previously been associated with Sliver-related infrastructure [3]. The use of this framework reflects a broader trend of attackers repurposing legitimate offensive security tools for stealthy C2 communications. Connections to 137[.]220[.]59[.]55 (ASN AS20473 AS-VULTR) indicated that the communications were likely routed via a virtual private server (VPS) hosted by Vultr. Attackers often utilize VPS infrastructure from legitimate cloud providers like Vultr to obscure their true origin, blend into benign traffic, and evade IP-based detection mechanisms [4].
Figure 5: Darktrace’s Cyber AI Analyst detection of two linked unusual connections to Vultr infrastructure.
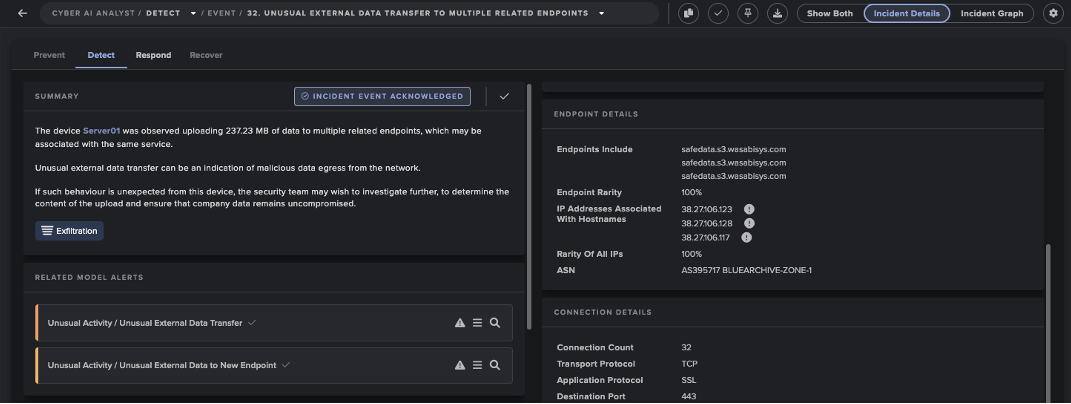
Darktrace also observed a device initiating SSL connections to safedata.s3[.]wasabisys[.]com, an endpoint associated with Wasabi cloud storage. Darktrace recognized that neither the destination nor the associated IP address had previously been observed within the environment. More than 200 MB of data was subsequently uploaded externally to endpoints sharing the same JA3 client hash, indicating a sustained transfer session and potential data exfiltration to third-party storage. The apparent exfiltration prior to encryption is consistent with a double-extortion ransomware strategy.
Figure 6: Darktrace’s Cyber AI Analyst detection of more than 30 rare outbound connections to a Wasabi cloud storage endpoint, indicative of potential data exfiltration
Day 4: Encryption
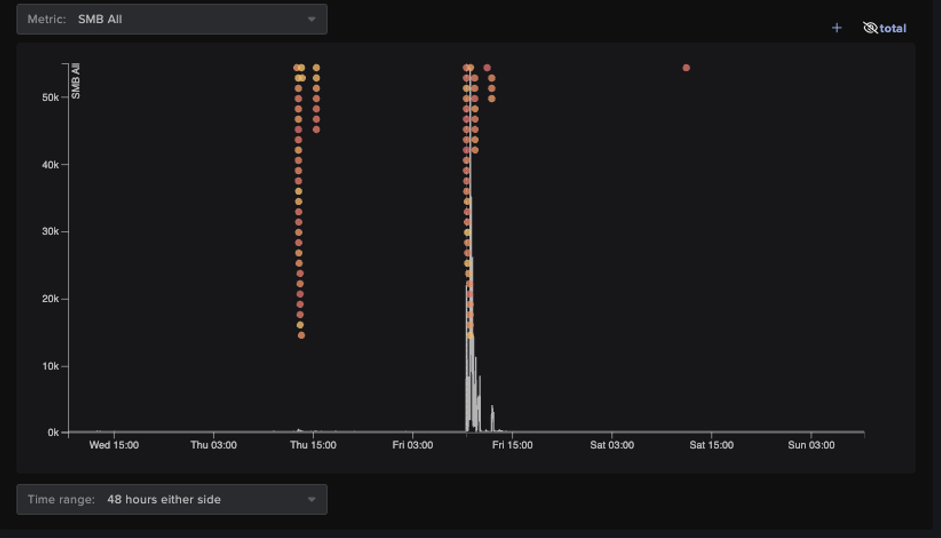
The attack culminated in ransomware deployment, marking the transition from suspicious network activity to a business-impacting incident. Using SMB-based propagation, the threat actor encrypted thousands of files across the network, affecting multiple systems and disrupting normal operations. Throughout the encryption event, the legacy SMBv1 protocol was used extensively across multiple internal systems, resulting in a significant increase in newly encrypted files.
Figure 7: Darktrace’s detection of abnormal spikes in SMB activity and associated model alerts, indicative of ransomware encryption and propagation.
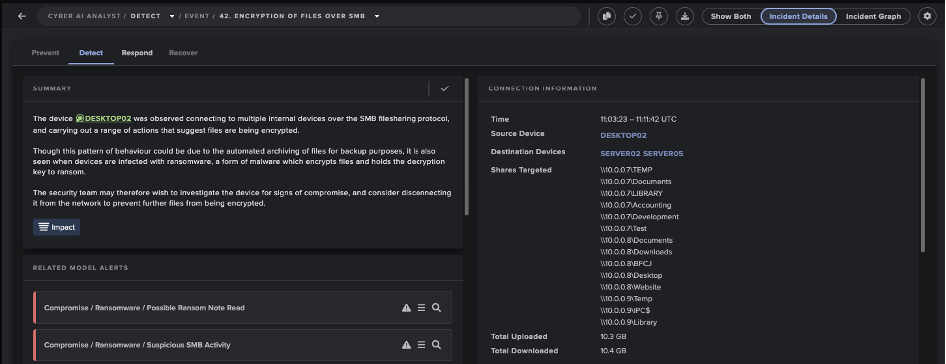
Darktrace’s Cyber AI Analyst automatically investigated and correlated the encryption activity and related events into a single incident narrative, providing the customer with real-time visibility into the attack while significantly reducing investigation time.
Figure 8: Darktrace’s Cyber AI Analyst’s investigation into the encryption activity. AI Analyst incident detailing example encryption activity in real time. Related events are automatically correlated and summarized into a clear narrative, reducing investigation time.
Defender action recommendations
What Could Have Stopped the Attack Earlier?
Although the attack ultimately resulted in ransomware deployment, there were multiple opportunities to detect, contain, and disrupt the intrusion before encryption occurred. The following actions could have significantly reduced the overall impact:
Detect and investigate indicators of reconnaissance and lateral movement
Unusual scanning
Active Directory replication anomalies consistent with DCSync activity
Anomalous use of native tools and processes indicative of LOTL attacks
Unusual use of common reconnaissance tools such as Nmap and NetScan
Contain compromised credentials and affected devices
Disable and reset compromised VPN credentials
Isolate devices performing anomalous scanning and lateral movement activity
Block suspicious external communications and data exfiltration
Use anomaly-based detection to detect and block repeated outbound connections to rare external infrastructure
Prevent data exfiltration to unauthorized cloud storage services such as Wasabi
Conclusion
The incident highlights the importance of anomaly-based detection, particularly against attacks that primarily use native or legitimate tools to evade traditional security measures. Darktrace identified suspicious activity from the first day of the compromise, providing multiple opportunities to disrupt the intrusion before it progressed to lateral movement and data exfiltration.
In this instance, detection was not the limiting factor; response time was. Prompt investigation and containment of devices exhibiting anomalous behavior could have prevented lateral movement, data exfiltration, and ultimately ransomware deployment.
As adversaries increasingly prioritize stealth over custom malware, relying instead on legitimate tools, valid credentials, and trusted infrastructure, traditional signature-based detection becomes less effective. Identifying subtle behavioral deviations early remains critical to disrupting attacks before they escalate into full-scale ransomware incidents.
Credit to Alexandra Evzona (Cyber Analyst), Priya Thapa (Senior Cyber Analyst) Edited by Ryan Traill (Content Manager)


.jpg)


.avif)